Color, Artboards and Transform tools
Lesson from your book:

 Color and painting are covered in chapter 6 of your book. Make sure you cover Color Modes and color controls (p.177-187).
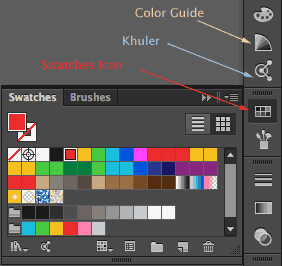
Fill (for closed shapes) and Strokes (lines) are important concepts in vector-based-drawing: You can check and change at any time both values in the Tool bar (pic left), the Control panel, Swatches panel (left).
This is a Multimedia class focusing on screen work, so we will work with RGB color.
Video: Linkedin. RGB versus CMYK color, CC 2018 Essential training, HERE (long link)
Mixing colors with the color panel, in the volume "Coloring artwork", HERE
It is important that you get used to work with swatches and create a palette of colors that you can reuse. Learn how to create edit, make a copy and save swatches (p.181-184).
Working with Swatches to control the colors in your document, HERE
The advantage of working with Global Swatches in your file, HERE
The Color Guide (p.191) and Khuler (p.197) (look at position of tools on the upper-right picture) will also help you work with a good Color-Palette: a number of colors that harmonize together in a Theme and that are visually pleasant and expressive. The most important part of color is how to combine them, after all.
applying color with the Color guide panel, HERE
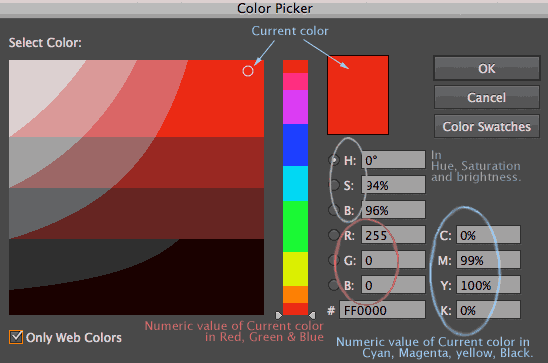 The Color Picker (p.185), is an important dialog window with very good control over color. Double click on the Fill or Stroke color in the Tool bar to get to it.
You might be unfamiliar with concepts in digital color. Here are some resources:
Web page:Color concepts and terminology (Additive and Subtractive color systems. HUE/chroma versus VALUE/level of light and dark).
Explanation of elements in the color-picker in Photoshop, which is very similar to the Illustrator tool HERE
Color theory, Color wheel chart: HERE
We will cover patterns and Live-paint later on, in module 14.
Artboards are covered in chapter 4 of your book (p118-126).
There are a number of practical tools that help you create a well organized lay-out: Make sure you cover working with Rulers and Guides (p.125 ) and positioning with Smart Guides (p.137) to be able to better align your artwork, this is specially important for web design.
By now all students should be using Layers as a way of structuring their work. You should get used to work with your layer window open. Layers should be named in that panel.
Grouping objects also helps organizing your work and can be used to apply filters.
Video Tutorial: "Grouping objects versus Collect Artwork into new layer", with Angie Taylor HERE
Video Tutorial: "Isolating shapes to edit within a group" HERE
 Transforming content is covered in the second part of chapter 4 of your book.
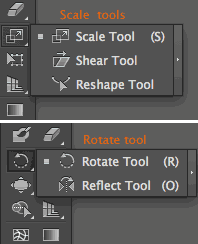
Make sure you cover how to Scale, Rotate and Reflect p.127-132.
The Shear tool is very useful to give a basic impression of perspective, by slanting the artwork. In combination with Rotate you will be able to create artwork with a 3rd dimension effect.
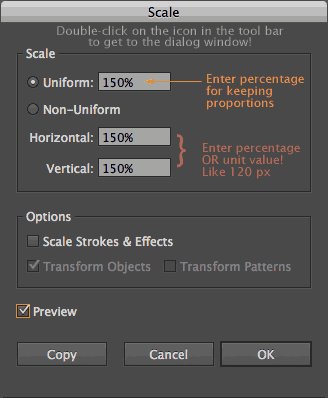
In professional projects uniformity and consistency is very important. Notice that you can enter numeric values when using these transform tools: you can access a dialog window for each one of them (see picture on right) when you double-click on the tool in the tool-bar.
Video Tutorial: Transforming tools, CC 2017 Essential training, HERE
Repeating transformation (repeat again,Command/Control_D)HERE
Reflect tool, HERE
Working with the Reshape tool, HERE
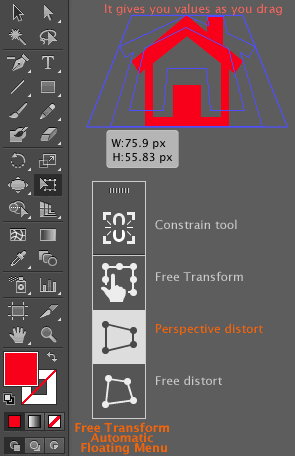 The Free transform tool is a very powerful tool for drawing. It distorts objects in different ways (4 sub-tools) and it is very helpful to give a quick approximation to perspective deformation, although there is a professional perspective system in Illustrator that we will use in module 9 of this course.
Training video: Working with the Free transform tool (watch the video from half way through), HERE
It is very important that the 4 tools give you real-time information about dimensions as you drag and deform the object.
Remember to First select the object/artwork to deform, then the tool to use.
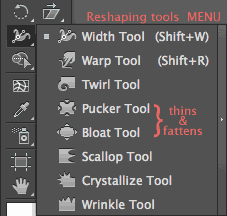 Cover how to transform geometry by reshaping paths with the Warp, Pucker, Bloat and effects (p134-142). Play with the Twirl, Scallop, Crystallize and wrinkle tool:those are incredible drawing tools that allow very organic work, perfect for physical effects
Video Tutorial: "Reshaping paths: Working with the warp tool"HERE
