Perspective drawing
Drawing in perspective is the final test of a good draftsman in our Western civilization, but our deficient educational system (that praises math and language over vision), makes it surprisingly difficult to find artists and designers that can actually draw with it.  Since Illustrator CS5 a new great tool has been included to help you draw in correct perspective and to represent space with depth.
The Western Perspective system was first developed during the Renaissance and it is based on Human Optics (resembling the functioning of the lenses in our eyes) so it's deformations of objects match the way our eyes see. Photography was also developed using human optics as a reference: this is why when we see a Photograph or a good perspective drawing we instinctively qualify them as "real".
Great & fun YOUTUBE video on perspective
Learn about the Perspective system: My online Powerpoint on Perspective.
 The Perspective tool in Illustrator is covered in chapter 9 in the old books, and it is not included in the new books anymore.
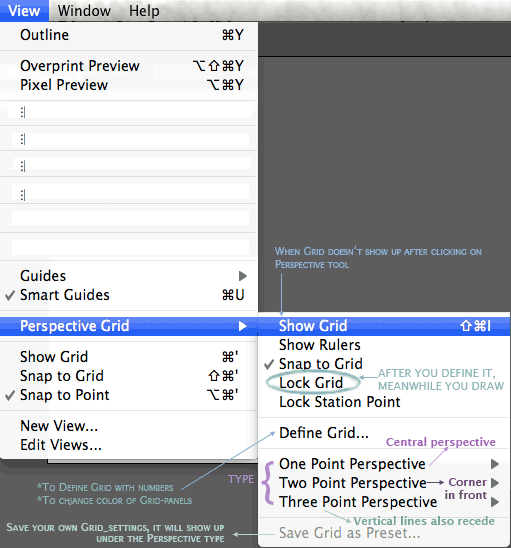
You can activate the tool by clicking on the perspective icon in the tool bar,
or go to:
View< Perspective grid< choose the type of Perspective you want to work with (1 point, 2 points or 3 point perspective).
Those 3 different types of perspective define different ways of looking at a space:
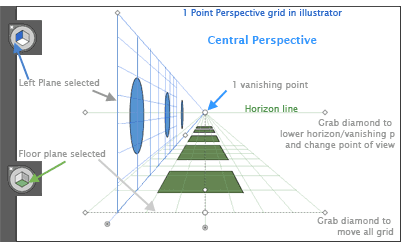
1 point P. Looking from the front of a scene, lines that run paralell among themselves and away from you appear all meging over a central point on the Horizon line. See first image up the page.
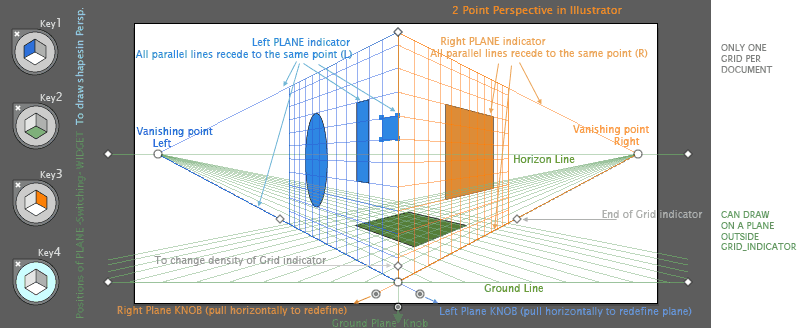
2 Point P. You are looking at a space with a corner infront of you: one side seems to escape towards a right point on the Horizon line, the other side escapes towards a point on the horizon line but on the Left (see image below). Notice that every line running towards a point, would actually run paralell to each other in reality.
What you see on the floor as the closest corner is a 90 degree angle, distorted in perspective.
Be careful with the distance between those 2 vanishing points on your grid: if you push the points together, that first angle will look Very distorted, so try to keep those points far appart from each other, outside your artboard.
Videos from Linkedin:
 Types of perspectives, from "Illustrator, Perspective Drawing", HERE (long link)
Activating the Perspective Grid in Illustrator, HERE
Parts of the Perspective grid, HERE
Adjusting the vanishing points, HERE.
Adjusting the grid planes, HERE


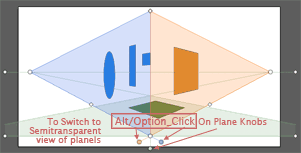
Make sure you cover how to Use and Edit the perspective grid, looking at the different planes and handles (see upper picture)
Use the Plane-switching Widget to select a plane(the plane is selected inside the litle cube-icon). Remember that a plane has to be selected in the widget to work with shapes in that plane. In the upper image you can see the key for each one. Look into how to switch a shape from one plane to another,
by pressing the keyboard-shortcut number.
Linkedin video: The Plane Switching widget, HERE
Video: The Perspective selection tool
Video: Drawing and selecting objects on the grid(important)
Video: Taking elements, drawn in Illutrator in 2D, and snapping them into the Grid, in perpective
Video: Releasing an onject from the grid
Video: Moving an object along a plane on the grid
 <
Training video: Place a text-box into the Perspective grid, Youtube
Symbols are fully covered on Module 15. Those were originally incorporated into Illustrator to prepare artwork into Flash-architecture; they are a great way of storing elements that you may want to exactly repeat a piece of artwork in a drawing and storing them to re-use (like using clones).
For adding symbols to a perspective grid check pages 288-289 of your book.
If want to know a little bit more about perspective as the Western system of representation click HERE
