The Pen tool and Bezier control
Lesson:
The pen tool is covered in chapter 5 of your book.
Make sure you understand the components of a path: Anchor points, direction lines and direction handles (p.148). If you are not familiar with this crucial tool, please follow all the chapter.
Following the complete tutorial is a great practice for you so work the complete lesson to produce the ice-cream illustration. Make sure you cover how to add and delete points (p.162) and how to cut paths and shapes with the Scissors and knife tools (p.166, 168).
An Achor point represents the location of a point with a tiny square.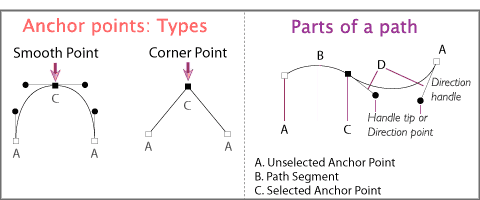
The tiny squared-icon looks hollow when it is not selected. The tiny square looks filled (in the color's layer) when the point is selected. A basic anchor point will only define a corner point position in your artboard.
To create accurate drawings you need to be able to produce smooth curves and have very good control over the tension of those curves. To define a curve with Vector Graphics we use a special type of point, called Bezier. In a Bezier point the anchor point defines the exact location, and the handle, ended in a "direction point" or little dot, defines the tension-curve to the next anchor point (read down how to transform a default corner point into a smooth/curve point)
Each anchor point has 2 handles, looking a bit like "antennas" on an old TV set. Handles in a smooth point only show when the anchor point is selected!
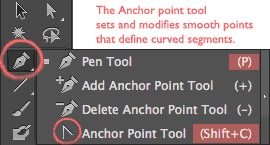 To set the curve of the point, o transform a corner point into a
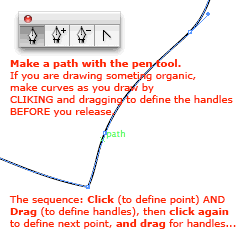
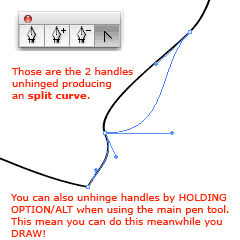
 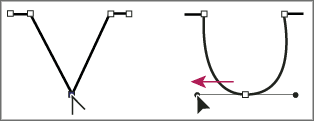 smooth or Bezier point, you will use the Anchor point tool inside the Pen tool (P). You can press P+Option/Alt and you will get to the Anchor point tool, that looks like a wedge (Look pic). Click and drag on the point.
Video tutorial: Undertanding achors and paths, Ilustrator CC 2015 Essential training, HERE
Learning game: Play the pen-tool game, dobe Help
Drawing with pen using the Control Panel
You can use the Control Panel (with a pen tool selected) to customize the tool.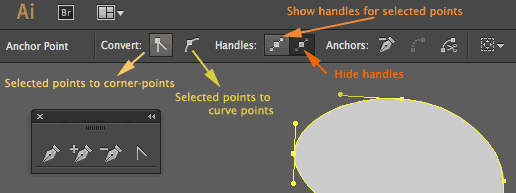
As you see, anchor points can be set to behave as a Corner point (that produce straight segments),
or as a Curve point, that uses "direction handles" to define curved segments. When you first use the pen tool it will produce by default corner points. To change that, you can select a point/points and change the behavior in the Control panel or you can select the point with the Anchor-point tool and drag the point a little: you will immediately see the direction-handles appear.
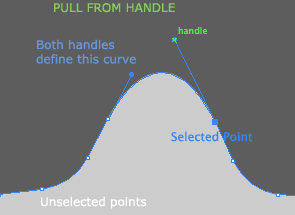
Notice that when you select a smooth/bezier point you also see one handle of the next point, since they both describe the curve.
To see the handles of all selected points, find in the upper menu Select<Choose Object<Direction handles (also through the control panel).
Modifying curves with the Anchor-point tool
That is the wedge or upside-down V tool.
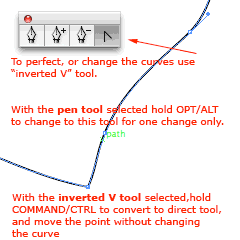
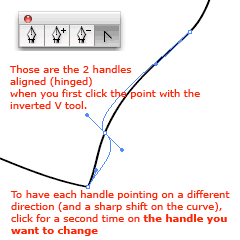
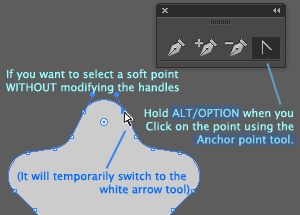 You will notice that when you click on a point with the Anchor point tool (little wedge) you loose the previously defined curve.
See the shortcut-solution to this in my blue pic. Holding Alt/Option when using any sub-tool of the pen tool will revert (meanwhile shortcut is held) to the Direct selection tool (or white arrow), that will select, but not modify curves.
(Place the pen-tools as a floating menu, the same way that you did with shapes)
Since this is such an important tool (you can use the exact same pen tool In Photoshop, Flash, After Effects and even Maya) there are many shortcuts to aid you working professionally with it.
Drawing well with bezier curves is a well recognized skill/Art and it takes practice. "Matte artists" in Special Effects make a living of the use of this tool.
By the end of the week you should be able to draw curved shapes straight ahead with the pen tool: this will make tracing objects from a bitmap file a fairly easy task.
Look at my notes below on how to draw with the pen tool.

 The Reflect tool. It is a sub-tool of the Rotate tool