Brushes and the Gradient mesh
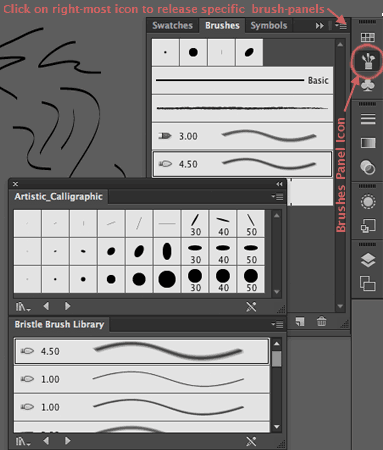 Brushes are covered in chapter 11 of your book.
Make sure you cover how to use Calligraphic brushes, Art brushes and the paintbrush (p.321-326), the Bristle brushes (p.331-334).
We will work more with pattern brushes on Module 14.
To use those brushes you will use the brush icon in the tool bar.
 Double click on a tool to access the tool's options.
Video tutorial: Create a new Calligraphic brush, with Emily Kay
Those videos belong to a Linkedin volume dedicated to all trypes in Brushes in Illsutrator.
Video tutorial: The scatter brush, with Emily Kay
Find the location of the Brushes panel and how to release specific panels (from the little right icon in the brushes panel_ see pic). Use that same menu, or the New icon in the brushes panel, to create New brushes of your own with customized values. You can save your own library of brushes.
When working with Brushes in Illustrator, it makes a huge difference to use a stylus pen with a wacom tablet (or other drawing tablet). The added feature is that you can set the brush to reflect the differences in Pressure that you apply to the pen on the tablet, to the resulting brush-stroke in Illustrator, mimicking the use of a true brush or calligraphic pen. See both videos in the lesson to learn how (you will have to create a new brush with Pressure instead of Fixed values).
Mocking brush strokes with any other line tool.
There is a new way of having perfect control over the width of any normal stroke (not a brush):
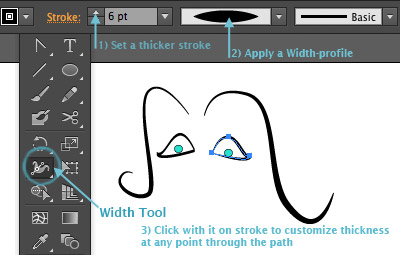 You can apply a width-profile instead of a uniform stroke up in the control panel, then use the Width tool to customize the thickness at any point. In this way, you can make any path (built with the pen, pencil or line tool and using a Stroke color), look like an elegant brush-stroke with maximum control of its shape and precise changes in width.
Video tutorial: Variable width strokes with Tony Harmer
Video: The Variable-width tool with Deke McLelland
Video:How to create a Custom Variable-width profile that you can re-use
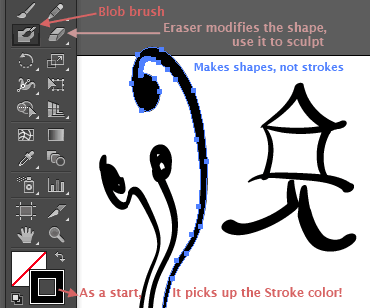 The Blob brush is another important drawing tool (p.340-344).
This tool, introduced in CS4 is the closest thing to paint with a true brush: It joins strokes into one shape, replicating the experience of painting with a brush and paint. You can use the eraser to polish the resulting shape.
The shortcut for the Blob brush tool is Shift_B. And although it creates shapes, not strokes, it uses the Stroke color in the fill/stroke palette. When you select the shape with the black arrow it will then refect the Fill color, weird).
Video Tutorial: Working with the Blob tool, Angie taylor for Linkedin
Video: Emily Kay on the Blob tool
Video tutorial: From Drawing without the pen tool (great old volume), Drawing with the Blob and eraser tools
and the Eraser tool
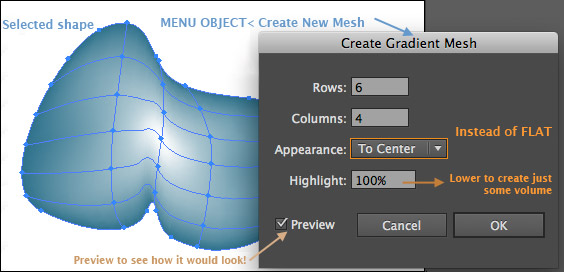 The Gradient mesh is an amazing too that allows you to create smooth transitions over a surface of color. It works like a 2D grid of gradients.
This is an advanced tool but at your level it can be used to create gradients that adapt to a shape (as oposed to the radial gradient, that expands as a circle or ellipse).
Video Tutorial: What is a Gradient mesh
 Video tutorial: Creating your first mesh (same volume)
Video: Adding color to a mesh
Video: Working with the points inside the mesh.
Those are Bezier points with handles and when you modify them, you begin to create organic lighting effects, to adapt the light shape to your object.
Trick to define a clean mesh in a problematic object (thin twisted objects, like stems).

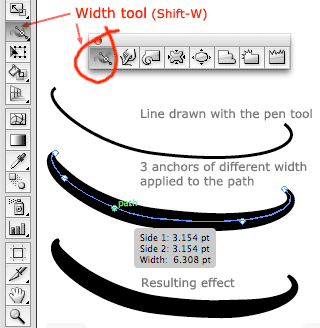 The Width tool allows you to easily modify a path in to a brush stroke with variable widths along it by defining anchor points.