Effects and the Appearance panel
 Applying effects is the cherry on top of Illustrator: they should be applied subtly and precisely because saturating the program's performance and causing long delays is easy when you are not thinking.
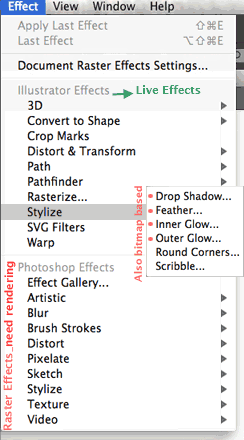
They are covered in chapter 12 of your book. There are 2 main types of Effects: Vector Effects and Photoshop/Raster effects. Vector-based effects are also called Dynamic or Live effects because they can be modified and tweaked at any moment. Photoshop/Raster effects need to be calculated and rasterized, something that takes a lot of processing power for Illustrator (it is a rendering process) and can cause delays to render and visualize.
When working with the book, make sure you cover how to apply and edit an effect (p.349-351), styling text with effects (p.352), Offsetting paths to create multiple strokes (p.357).
3D effects
are covered in page 361 to 364 in the first CC book.
Video Tutorial: CC 2019, Working with Effects
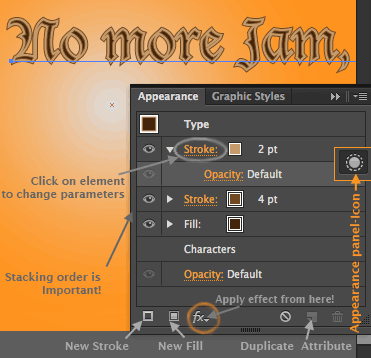
When you work with Effects, specially when you apply several of them, you will work closely with the Appearance panel. This Panel has become crucial to keep track and organize objects/paths with Multiple attributes (in the pic, a type object with 2 strokes and 1 Fill). It works like a Layers panel, were you can see, select and modify the stacking order of attributes.

Video Tutorial: From CC 2029, Exploring the Appaerance panel HERE
Video: Adding multiple Fills and Strokes, HERE
"Applying appearance atributes" is covered in chapter 13 of your book, pages 369-374.
Remember that Illustrator stores the attributes of an object as defaults for the next object you create (work on an object with a white to orange radial gradient with no Fill, draw a rectangle and it will get those properties).  To cancel that press the Key "D" as a shortcut to reset to the default Fill&Stroke colors. If you press D with an object selected it will also get reset to the default.
Video tutorial: Mastering the Appearance panel, with Angie Taylor
Video: Another good explanation for Multiple strokes through the Appearance panel
Opacity masks are used to obtain a soft-edge clipping mask, more Photoshop looking than a sharp clipping mask. You create them from the Transparency panel, and the "masking shape" works like an Alpha channel: white represents transparency and the darker the gray, the more opake. Both elements have to be selected before you click "make mask"
Video Tutorial: Deke McClelland on Opacity masks
Graphic styles are sets of Appearance attributes that can be set for re-use. They are specially important now because they can be directly translated into a CSS style through the new CSS properties panel (more on Module 12).
Using graphic styles
is covered on pages 375-380.
Video: Working with Graphic styles
