GDP111 Single Fold Card
Specifications: 1. Indesign Document Size: 2. Document Setup: - Fold
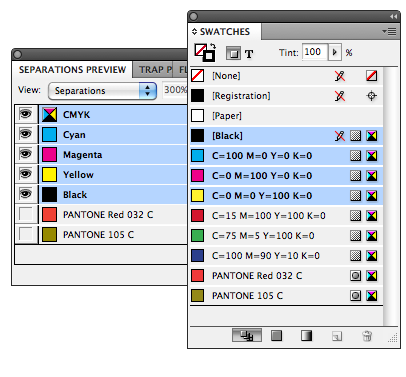
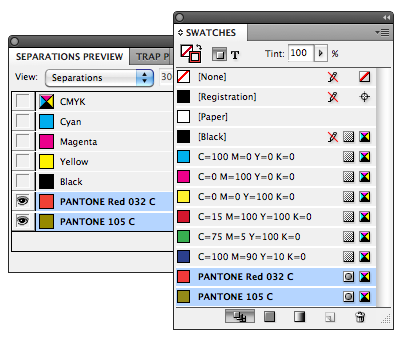
lines in InDesign (dashed): 3. Color: Check for the correct number of colors used. WINDOW>OTUPUT>SEPARATIONS
PREVIEW. - Inside of card: - Shadows in InDesign: When using effects to create a shdow in InDesign, it will create the shadow using BLACK which will add a third color. You MUST select one of the Pantone colors instead. Click on the black color square next to the BLENDING MODE option in the Effefcts panelk to select the Pantone color. Check for the correct number of colors used. WINDOW>OUTUPUT>SEPARATIONS PREVIEW. 4. Images: Create a Mockup (A close-to-reality rendition of a project) Use only raster images (photos). Photos must appear on the FRONT, BACK and INSIDE. For the 2-color inside layout, you may repeat the cover image but it must change to a monotone or duotone image.
Here are some additional links which will lead you to raster images of your choice.
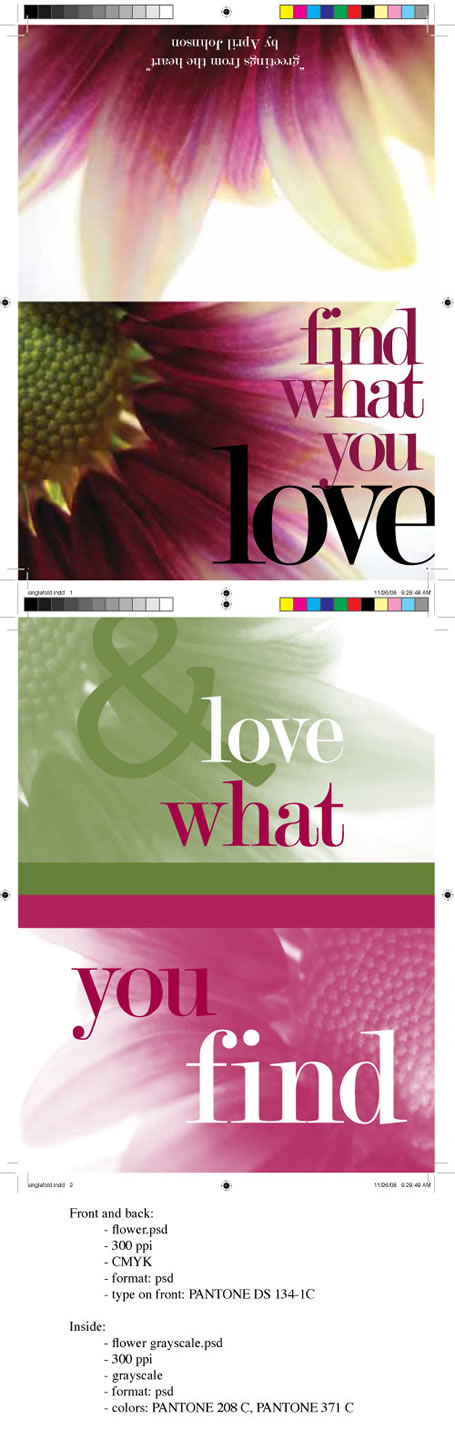
5. Copy: Add your name in about 9-10 point type at the bottom of the back page of the card. Remember to rotate it so it is upside down when you are viewing that page. 6. Resolution of image(s) The image and text you choose must reflect the content of the card. 7. Bleed: Required on the front of the card on page 1. Bleed must extend at least .125" beyond the trim of the document. 8. Page 3 information: Example: flower -300
dpi, cmyk, tif Sample Card: - 3 Indesign pages
|
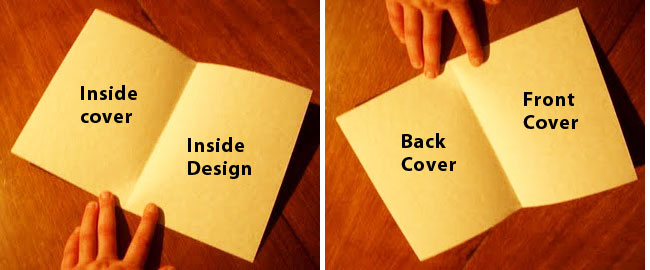
Instructions: 1. Create a mockup of your folded card. Label your mockup indicating the "COVER" and "INSIDE." This will show you the correct side to place elements. When you flip the mock-up over, you will see that the inside cover elements must be placed on the left-hand side of the page layout in Indesign.
2. Prepare your photo(s): • Prepare
the 4 color image(s) for the front and back in Photoshop. • Change the image color mode: Convert the image(s) to cmyk: image>mode>cmyk. • Change the image size resolution. Convert "inside images to grayscale or duotone. Save the image for the inside as a ".psd" or ".tif" file
if it is a process color image. Note: You can apply a Pantone spot color to a grayscale image in Indesign. Use this link to review how to convert images in Photoshop. 3. Create a new InDesign document
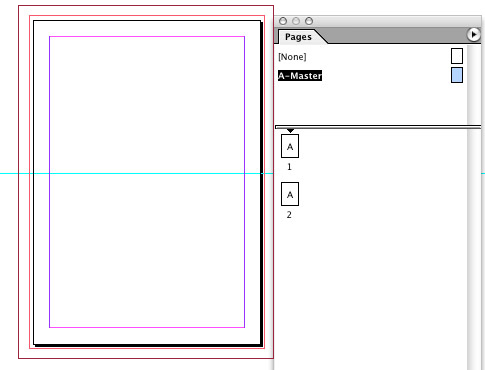
4. Fold lines are added on the Master Page. Open Page panel and select A-MASTER (pages) Masters commonly contain repeating logos, page numbers, headers, and footers. They can also contain empty text or graphic frames that serve as placeholders on document pages. You can quickly compare alternative design ideas by creating a variety of masters and applying them in turn to sample pages containing typical content. On the Master Page, using the guides from the ruler, create a center guide to indicate where the fold will be by dragging a guideline from the ruler to half way down or across the page. To create the fold marks you need to create two 0.5
point, dashed lines in registration color. Using the line tool or pen tool, create a 0.75" stroke. Apply .5 point weight to the stroke. Choose the dashed line option in the stroke palette. Select registration color in the swatch palette. Place two dashed fold marks on each side of the document and inside the Slug area.
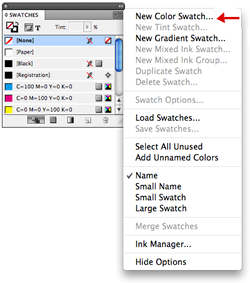
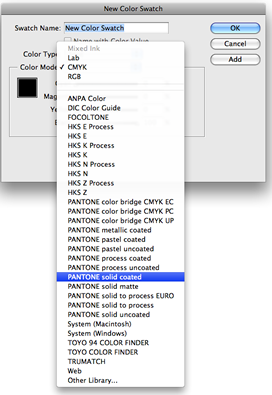
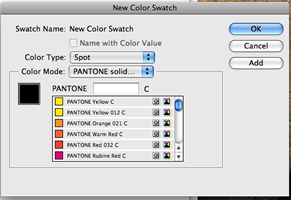
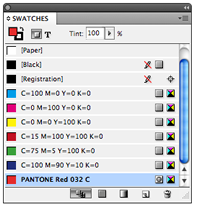
Go to the resources in Unit 8 for more master page tutorials. 5. Open page one by double clicking on the page icon in the pages panel. If the page icon does not have the A" on it (representing that Master A will apply to that page) then drag the master icon to the page icon and the A should appear. Referring to your mockup, place the process color cmyk image and text for the cover and the image and your name/logo/icon on the back cover on this page. The back cover should be in the top half above the guideline. Rotate the elements for the back so that they are upside down. Double click on page two to create the inside of the card. If there is not yet a page 2 in the pages panel then drag a new page from the master into the pages area or go to the small arrow and insert a new page. To select Pantone colors in InDesign: Go to swatches>New Color Swatch. In the next window go to color mode>Pantone Solid Coated. A new window opens. Scroll through the colors and pick the one you want. It will then be added to the swatch panel.The following illustrations show you how to find the Pantone Solid Coated colors in InDesign. Repeat this process and choose a second Pantone SOLID color for your design.
Create a Grayscale Image for the inside photo:
|
#6. WINDOW>OUTPUT>SEPARATIONS PREVIEW
#6. WINDOW>OUTPUT>SEPARATIONS PREVIEW |
6. Check for the correct number of colors
used. If you see additional colors in your separation preview, go back to edit the original file and correct the color usage until you are certain there are the correct number of colors per page. Proofing (do not hand-in proofing files): If you have access to a laser printer, proofing includes generating printed color separations. Printing separations insures the success of your "print-ready" files and will avoid costly delays or expense before you deliver files to a commercial printer. Inkjet printers do not have the capability of printing color separations. After you have completed the final layout: 7. Complete page three of the document. 8. Save the Indesign Package. 9.
Export file as PDF for High Quality Print. How to save Indesign file as PDF with Printer Marks 10. Upload PDF. |