We will be using Photoshop CS5 but the slicing tool has existed since CS3, when it was implemented through the web sister-program called Image Ready.
To slice you have to have a webpage already designed in Photoshop and guides on the page delimiting the areas that will become graphics on your page.(see guides in example)
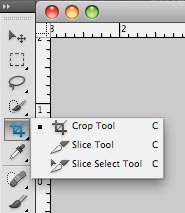
There are 2 slicing tools:
the Slice tool and the Slice select tool.
There are situated under the crop tool in the Photoshop tool bar.
You make user slices with the Slice tool.
Notice that when slicing there are many options if you right click on a slice.
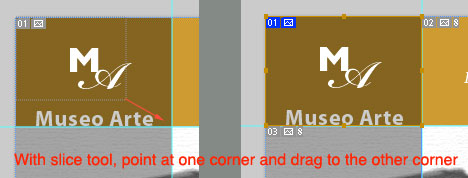
To make a user slice on a graphic already delimited by guides, you take the slice tool and click on ONE corner of the rectangle, then drag to the OPPOSITE corner and let the mouse go.
User slices have a number and little icon with a blue background on the upper-left part of the slide ( see image on the right)
When you make a user slice, the rest of the space will be divided in automatic slices so an HTML table can be built out of it.
Automatic slices have a number and little icon on a gray background on the upper-left part of the slide.
MENU SLICES
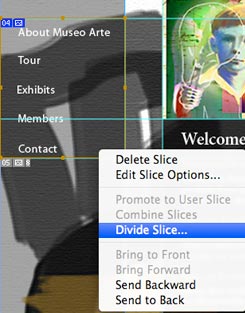
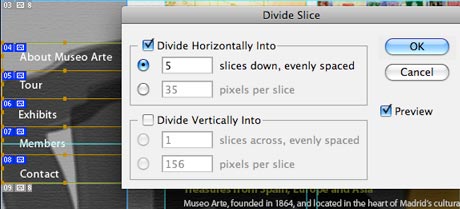
To draw the even slices of a menu you can first make a big slice that includes all the new items (slide n 4 on the first image on the right)
Then right click on the slice and choose "Divide slice".
The Divide Slice menu lets you choose numebrs to evenly divide the slide horizontally or vertically or divide by pixel dimensions (second image on your right).
NAME SLICES AND SET LINKS IN PHOTOSHOP
Once the slides are made, you can work on them by changing into the Slice Select Tool and right clicking on the slice.
Choose Slice Options from the right click menu, and define:
The slice NAME. This wil be the name of this graphic when you later export the slices into independent images (from the "Save for Web&Devices window").
The URL. This allows you to create a link to another page. It can be a page in your site (the page has to be also in the root folder, at the same level than the current page). You can also set a link to an absolute web address by giving the complete URL, beginning with http://www.
You can set the TARGET to specify if the link will open replacing the current page (_self) or in a new window (_new).

When all your slices are in place, user slices have been named and links placed if neccesary it will be time to Set the compression of your user-slice graphics. Each one of those slices will become an idependent image saved in a folder inside your root folder called "images"
Go to File<Save for Web& Devices and click on the Optimized or the 2-Up tab on the upper area (In CS6 the option will be called Save for Web).
You can set the compression by selecting one slice at a time or by selecting groups of slices that need the same type of compression.
If you select a number of user-slices and set compression on the right area of the window, the same compression will aply to all the selected slices.
To select, you just click on the slice with the select slice tool in the window (see upper left of the pic). To select more than once slice (Increase Selection) press SHIFT while you click on another slices.
Remember that Photographic images or those using a lot of gradients should be saved as JPEGs. Images that use a few flat colors work better as GIFs, and a gif should have the leadst amount of colors in the palette to produce a visually acceptable result.
To see how the image looks compressed you should work with the
"2-Up" option in the Save for Web window. Loop up to the left and you will see the visualizing options:Original, Optimized, 2-Up, 4-Up.
The Optimized version gives you more space to see your page's content but the 2-Up will set you see the visual changes with compression.

OPTIONS FOR THE SAVE
The html file's name will default to the name of your photoshop file. You can also change that name before you click the final button, in the saving dialog box.
You should save the page in a previously made "root folder" named "yourname_root_test". a Root folder is a normal folder that contains all the site elements and will be copied to the server to put up the site. If at this point you hadn't created the folder you can here click on the button "New Folder" on the bottom-left of the dialog window, then keep with selecting your exporting options.
Format settings: In any case you will save "HTML and IMAGES".
Settings: Choose DEFAULT SETTINGS.
Slices settings:
IF the design of the page uses a flat background color, you can export only the "ALL USER SLICES".That excludes exporting the automatic slices. You could then set an hexadecimal value for be the background color of the html page in Dreamweaver or any other html editor, but I am not requiring that in the exercise.
IF the design of the page used a background image or a pattern, you could save it as a separate graphic file (jpeg or gif) and set it to work as the background of the page in Dreamweaver or any other html editor.
IF the design of the page uses a background image or complex pattern intertwined with the page design, like in my sample file, you can choose save "ALL SLICES" .
With this option you will be using more images for the page and the loading will take a bit longer but the html page will look exactly like your Photoshop design. Please choose this option when working with my sample file.

You should submit the root folder containing the html file and the images folder.
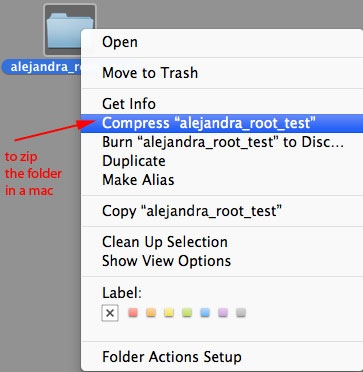
To be able to submit everything in one shot you should zip your root-folder. It will also make it slightly smaller.
If you are using a mac the zip utility is embedded in the system folder. Right click on the folder name and find the "compress..." item. It will create a zipped folder at the same level that the original folder is placed.
If you are using a PC with Windows 8, you can also right click on the file name and choose compress file. For an older system you will want to download a free Zip or RAR application, like WinZip.