HTML5 and CSS3 in Dreamweaver – Part 1: Building the web page
Requirements
Sample files
- Download citrus_pt1.zip (if you haven't already), and extract the files to your local computer. When expanded, you should have a folder called citrus, with three other folders and a text file inside.
- In Dreamweaver, select Site > New Site to open the Site Setup dialog box.
- Type Citrus Cafe in the Site Name text box.
- Click the Browse for folder icon alongside the Local Site Folder text box, and select the citrus folder.
- Click Save to create the Citrus Cafe site.
- Expand the folders in the Files panel. The site structure should look like Figure 9.
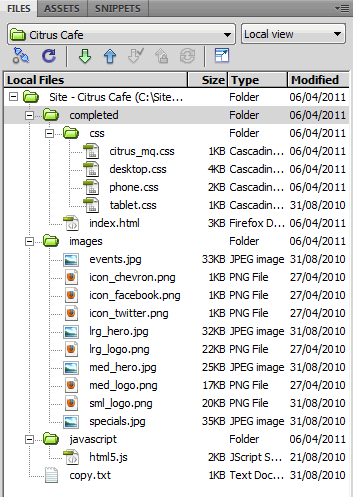
Note that the images folder contains different size versions of some images. The javascript folder contains the file html5.js, a copy of Remy Sharp's script that cajoles Internet Explorer 6, Internet Explorer 7, and Internet Explorer 8 to apply CSS to the new HTML5 elements.
Inspecting the basic HTML structure
The structure of an HTML5 page is basically the same as for HTML 4.01 and XHTML 1.0, but some parts of the code are much simpler than before.
- Select File > New to open the New Document dialog box.
- In the Blank Page section, set Page Type to HTML and Layout to <none>.
- Make sure the DocType pop-up menu is set to HTML5, and click Create.
- Save the page as index.html in the Citrus Cafe site root.
- Switch to Code view to inspect the HTML skeleton Dreamweaver has created (see Figure 14).
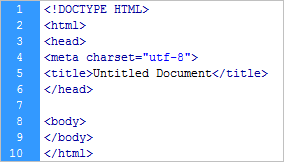
- Change the page's title to Citrus Cafe. and save the page.
You should note two points here: The DOCTYPE declaration and the <meta>
tag that sets the encoding to UTF-8 (Unicode) are both much simpler
than in previous versions of HTML and XHTML. Otherwise, the code is the
same as for HTML 4.01.
Note: The 11.0.3 updater for Dreamweaver CS5 uses a longer version of the <meta> tag. The longer version is not incorrect, but the version used by Dreamweaver CS5.5 is more succinct.
For backwards compatibility with XHTML 1.0, HTML5 permits the insertion of a closing slash on tags—such as <meta> , <link> , and <img> —that don't have a closing tag. However, Dreamweaver CS5 keeps the code simple by using standard HTML syntax.
Note: To convert existing XHTML pages to HTML5, select File > Convert > HTML5. Dreamweaver changes the DOCTYPE declaration, and removes the closing slashes from single tags.
Creating basic styles for the new HTML5 elements
- Select File > New > Blank Page > CSS and click Create.
- Save the new style sheet as desktop.css in a new folder called css in the site root.
- Add the following style definition to the new style sheet:
article, aside, figure, footer, header, nav, section {
    display: block;
    margin: 0;
    padding: 0;
}
- Close desktop.css. With index.html as the active document, select Format > CSS Styles > Attach Style Sheet, and navigate to the style sheet you have just created to link it to index.html.
- Select desktop.css in the Related Files toolbar to make sure you attached the new version of the style sheet, which should have only the style definition you created in step 3.
- Select File > Save All Related Files to save both files.
This ensures that the HTML5 structural elements are styled as
block-level elements without any margins or padding. In other words,
they will behave exactly the same as <div> elements.
Adding the <header> element
According to the HTML5 specification: the <header> element "represents a group of introductory or navigational aids." So, the <header> will contain the page's main heading, logo, and navigation menu. The <header> will also contain another HTML5 structural element: <nav> . Unless you're prepared to type all the tags in Code view, you need to add the elements in a specific order.
Follow the instructions carefully in this section, as it's easy to make a mistake.
- Make sure you’re in Split view, and select Source Code in the Related Files toolbar so you can see the HTML being created as you type.
- Click inside Design view, type Citrus Cafe, and format it as a level 1 heading by pressing Ctrl+1 (Windows) or Cmd+1 (Mac).
- With your insertion point inside the text, select
<h1>in the Tag selector to ensure the surrounding tags are selected. Then right-click the selected text in Design view, and select Wrap Tag from the context menu. - Type head, and press the down arrow once to select header from the code hint menu (see Figure 15).
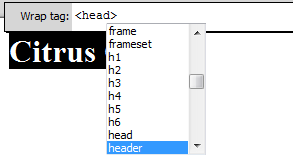
- Press Enter/Return twice. The
<h1>heading should now be wrapped in<header>tags, as shown in Figure 16.

- Click to the right of the word Cafe in Design view, and press Enter/Return. This inserts a new paragraph inside the
<header>element. - Type Sustainable, organic and natural in the new paragraph, and press Ctrl+2 (Windows) or Cmd+2 to format it as an
<h2>heading. - With your insertion point at the end of the second heading, press
Enter/Return once to insert a new paragraph between the closing
</h2>and</header>tags. - Convert the new paragraph into the first element of a bulleted list by clicking the Unordered List button in the Property inspector in HTML mode.
- Add five items to the bulleted list: Home, Menus, Reservations, Gallery, and Contact.
- Add a dummy link to each item in the bulleted list by selecting the text, and typing a hash symbol (#) in the Link text box of the Property inspector in HTML mode.
- Select
<ul>in the Tag selector to select the whole unordered list, right-click the selected list in Design view, and select Wrap Tag from the context menu. - Select
navin the Wrap tag mini-panel, and press Enter/Return twice to wrap the unordered list in a pair of<nav>tags.Your HTML code should now look like Figure 17.
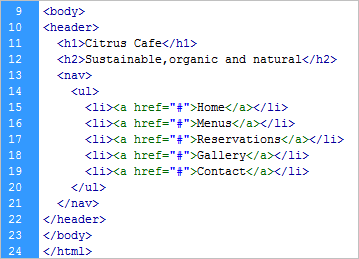
- The
<header>element needs an ID. This is one of the occasions you can use the Property inspector for the HTML5 structural elements.Select <header> in the Tag selector, and type logo in the ID text box. Press Enter or Tab to apply the ID.
- With the
<header>still selected, click the Insert Div Tag button in the Common category of the Insert panel/bar, or select Insert > Layout Objects > Div Tag. - In the Insert Div Tag dialog box, make sure the Insert pop-up menu is set to Wrap around selection, and type container in the ID text box.
- Click OK to wrap the
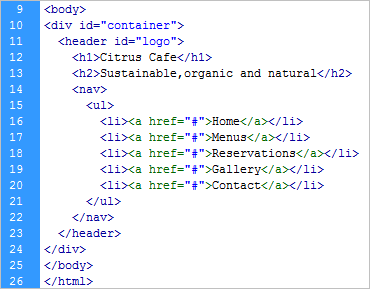
<header>in the new<div>element, and save index.html.Your HTML code should now look like Figure 18.
Adding the main content
To save some typing, the main text for the rest of the page is in copy.txt.
- To hold the main section of the page together, you need a
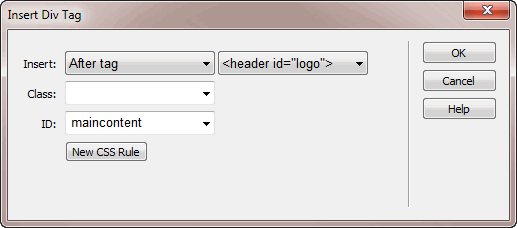
<div>element purely for styling. Click the Insert Div Tag button in the Insert panel/bar, or select Insert > Layout Objects > Div Tag. - In the Insert Div Tag dialog box, select After tag from the Insert pop-up menu. This activates another pop-up menu alongside, which lists all elements that have an ID. Select
<header id="logo">from this menu, and type maincontent in the ID text box, as shown in Figure 19. Click OK to insert the<div>element.
- With the placeholder text still selected, right-click the text in
Design view, and select Wrap Tag from the context menu. Select article from the code hints list, and press Enter/Return twice to wrap the placeholder text in
<article>tags. - Dreamweaver should automatically select the surrounding
<article>tags, allowing you to add an ID. Type vision in the ID text box in the Property inspector. - Replace the placeholder text in the
<article>element with the first sentence from copy.txt (it begins with "A new neighborhood"). It's probably easier to do this in Code view, to make sure you don't accidentally delete the<article>tags. - For this next part, you need to remain in Code view, because trying
to work in Design view and the Property inspector results in the
insertion of unwanted tags or tags being inserted in the wrong place.
Dreamweaver hasn't quite caught up with the new syntax.
Type the following code immediately after the
<article>you have just inserted. Although there's a lot of code, code hinting in Dreamweaver should speed up the process. Also, you can copy and paste the paragraphs in the final<section>element from copy.txt.
<section>
  <a href="#"><h1>Today's specials</h1></a>
  <figure></figure>
</section>
<section>
  <a href="#"><h1>Events</h1></a>
  <figure></figure>
</section>
<section>
  <a href="#"><h1>News</h1></a>
  <article>
    <p>9/1 Celebrity Guest Chef Night</p>
    <p>9/3 New Menu Samplers!</p>
    <p>9/4 Chef Citrus Style</p>
    <p>9/23 Pork Pork and More Pork</p>
    <p>10/1 Celebrity Guest Chef Night</p>
    <p>10/3 New Menu Samplers!</p>
    <p>10/4 Iron Chef Citrus Style</p>
  </article>
</section>
- In Design view, click carefully below the "Today's specials"
heading, and check in Code view that the insertion point has been placed
between the
<figure>tags. If you find it difficult to get the insertion point in the right place, click to the right of the heading, and press the down arrow key once. - Click the Insert Image button in the Common category of the Insert panel/bar, or select Insert > Image.
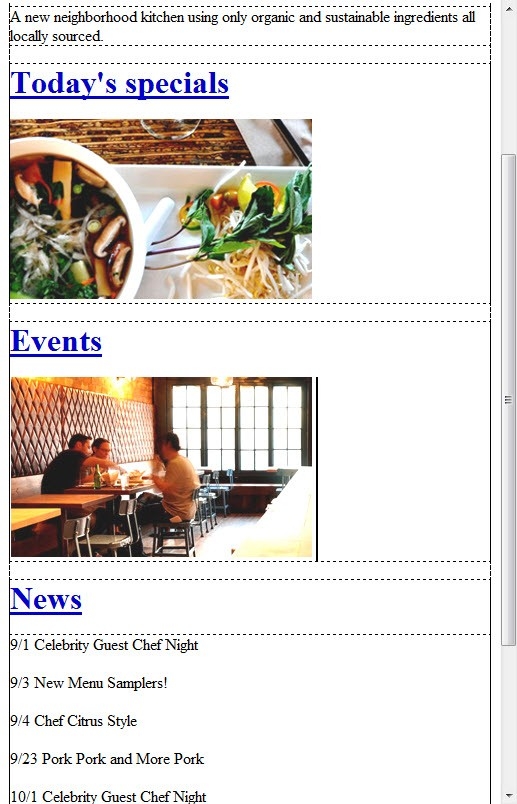
- In the Select Image Source dialog box, select specials.jpg in the images folder, and click OK (Choose on a Mac). Give the image some alternate text in the Image Tag Accessibility Attributes dialog box, and click OK.
- Repeat steps 7 and 8 under the "Events" heading, and select events.jpg in the images folder.
The
maincontent <div>should now look like Figure 20 in Design view.
- The numbers in the "News" section are dates, so they should be wrapped in
<time>tags. Select 9/1 in the first news item, right-click, and select Wrap Tag from the context menu.Type ti to select time from the code hints menu, and press Enter/Return twice to wrap the text in
<time>tags. - With the insertion point inside the
<time>tags, open the Tag Inspector by clicking its tab or selecting Window > Tag Inspector.Make sure the Attributes button is selected, and click in the field alongside
datetime.The
<time>element requires the date and/or time to be specified in thedatetimeattribute in the format recommended by the International Organization for Standardization (ISO): YYYY-MM-DD HH:MM:SS. In this case, you need only the date, so type 2011-09-01 in thedatetimefield (see Figure 21).

- Repeat steps 10 and 11 for the remaining dates in the news section, adjusting the value of the
datetimeattribute as necessary.
Adding the <footer> element
- Select
<div#maincontent>in the Tag Selector to select the whole<div>element, and press your right arrow key once to position the insertion point outside the closing</div>tag. - Click the insertion point in Code view, and type <foo. This selects the code hint for the
<footer>element. Press Enter/Return to autocomplete the tag. Add the closing angle bracket, and type </ to add the closing</footer>tag. - Position the insertion point between the opening and closing
<footer>tags, and click the Insert Div Tag button in the Insert panel/bar.In the Insert Div Tag dialog box, select At insertion point from the Insert pop-up menu, type facebookTwitter in the ID text box, and click OK.
- Delete the placeholder text in the new
<div>element, and insert the images, icon_facebook.jpg and icon_twitter.jpg inside the<div>. Copy from copy.txt the two paragraphs containing the address and phone number, and paste them after the
<div>inside the<footer>element.The
<footer>code should look like Figure 22.

In Part 2 of this tutorial series, you'll bring the page to life with CSS, including emerging CSS3 features, such as rounded corners, box and text shadows, and transformations.