Understanding Embedded Styles
An external style sheet is a separate file with a .css extension that contains a collection of rules for formatting elements of a Web site. Because external style sheets can be applied to many pages at the same time, they are an excellent way to make sure that the formatting of an entire Web site is consistent. There may be times, however, when you want one page of the site to look different from all of the others. You can create a style that is only used on one page by using embedded styles. Unlike external files, the code of embedded styles is embedded within the code of that page. Embedded styles override external styles. Note the difference between embedded styles and inline styles.
Here is what the CSS code looks like when you format a document with "Page Properties..." ("Use CSS instead of HTML tags" setting must be selected).
<!DOCTYPE html PUBLIC "-//W3C//DTD XHTML 1.0 Transitional//EN" "http://www.w3.org/TR/xhtml1/DTD/xhtml1-transitional.dtd">
<html xmlns="http://www.w3.org/1999/xhtml">
<head>
<meta http-equiv="Content-Type" content="text/html; charset=iso-8859-1" />
<title>module 6</title>
<style type="text/css">
<!--
body,td,th {
font-family: Georgia, Times New Roman, Times, serif;
font-size: 14px;
color: #FFFFFF;
}
body {
background-color: #000000;
margin-left: 24px;
margin-top: 12px;
margin-right: 24px;
}
-->
</style></head><body>
<h4>part 1</h4>
</body>
</html>
The CSS code lies in between the head tags. The code begins with <style> and ends with </style>. The first part
body,td,th {
font-family: Georgia, Times New Roman, Times, serif;
font-size: 14px;
color: #FFFFFF;
}
is telling the browser to see whatever is in between the body, the td (table data) or the th (table header) tags as the font family, font size and font color listed above. So we will see white text, with Georgia font at 14px.
The next set of code
body {
background-color: #000000;
margin-left: 24px;
margin-top: 12px;
margin-right: 24px;
}
effects only what is in the body tag, in this case the background will be black and the margins will be setting accordingly.
Creating, Applying, and Modifying a Custom Style
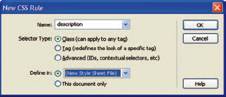
The New CSS Rule dialog box is used to create embedded styles and styles that are added to external style sheets. To get to this dialog box, go the CSS Styles panel and click the New CSS Rule button. To indicate that the style should be an embedded style, go to the Define in section and click the option button that says This document only.
A Custom style, also called a class style, contains a number of different formatting attributes that you can apply to text or other page elements. After you name a style and click OK, the CSS Rule Definition dialog box will open. This dialog box contains eight categories whose settings can be defined.
After you have created a custom style, it will appear in the CSS Styles panel along with the other styles. If you want to apply this custom style to a portion of a Web page, first select the element to which you want the style to apply. Next, click the style in the Style list of the Property inspector. To edit a custom style, click the style you want to edit and then click the Edit Style button in the CSS Styles panel. Finally, use the CSS Rule Definition dialog box to change the settings. One great feature about CSS is that any changes that you make to the style are automatically altered on each individual Web page where the style has been inserted.
Redefining HTML tags
Whenever you change an element of a Web page using the Property inspector, Dreamweaver adds an HTML tag to the element. At some point, you may decide that you want to change an HTML tag yourself in order to alter the elements that have that tag. For example, you can redefine the <b> tag, normally used to make text bold, to mean that everything with this tag will be put in green italics. To do something like this, first go to the New CSS Rule dialog box and click the Tag option button. Next, click the Tag list arrow to view all available HTML tags. Then, click the tag you want to redefine, and click OK. This will open the CSS Rule Definition dialog box. In this dialog box, you can change the formatting settings. After you save the new tag, all of the selected text will be formatted according to the new settings you have chosen. Later, if you want to change the settings again, click the setting in the CSS Styles panel. This will show the list of all customized HTML tags. Select the HTML tag you want to edit. Then, click the Edit Style button. This will open the CSS Rule Definition dialog box where you can make the necessary changes. Note that there are two modes in the CSS Styles panel: All (document mode) and Current (selection mode). Make sure you understand the difference between these.