In this exercise you will learn how to use behaviors in Dreamweaver to create remote rollovers. By remote rollovers, I mean images that change on a different part of the page, not underneath the image you put the mouse over. This is useful for image galleries where you use thumbnail images and want a larger image to load when you put the mouse over the thumbnail.
You will be using the files from exercise 5a, YOU MUST have completed exercise 5a in order to do this exercise...
- open index1.html
- save as gallery1.html
- in the code or split view, delete all the text in the content div tag (the box should be completely empty)
- create a new CSS rule and title it .contentImage
- select the Background category
- select the Box category
- Width: 600px
- Float: Left
- Padding: 9 for all
- Margin: 0 for all
- create a new CSS rule and title it .contentThumbs
- select the Background category
- select the Box category
- Width: 182px
- Float: Right
- from the INSERT/Common panel, click Insert div tag
- Insert: At insertion point
- Class: contentImage
- click at the end of the new code and hit enter or return
- from the INSERT/Common panel, click Insert div tag
- Insert: At insertion point
- Class: contentThumbs
- in the code, select the Content for class "contentImage" Goes Here and delete
- insert the following file from the images1 folder:
- in the code, select the Content for class "contentThumbs" Goes Here and type gallery
- highlight gallery
- select Heading 1 from Format in the Properties inspector
- click and the end of <h1>gallery</h1> and hit return or enter
- insert the following file from the images1 folder:
- 01_thumb.jpg - 12_thumb.jpg
- create a new CSS rule and title it .contentThumbs h1
- Font-size: 18px
- Font-weight: lighter
- Color: #FFF
- create a new CSS rule and title it .contentThumbs img
- select the Box Category
- Padding/Top: 9px
- Padding/Right: 12px
|
exercise files
|
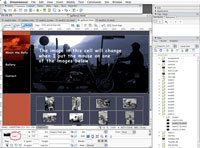
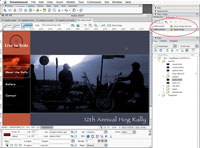
- click on the image that you want to use as the remote rollover with (this is the area that will change when you put the mouse over the thumbnail)
- in the properties inspector, type "main" in the image ID field (circled in red)
|
 |
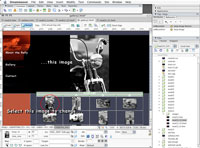
- click on each of the thumbnails added in step 15 to set the image ID for all of your thumbnails (if you don't do this, they will be hard to recognize in the Swap Image window). use thumb1, thumb2, thumb3, thumb4, etc for the IDs.
- select the 01_thumb.jpg image
note: the large image was changed in the example below to show you where the rollovers occur. DO NOT change the large image in DW, leave the image there that you started with.
|
 |
- now open the Tag Inspector by clicking the tab on the top right of the palette
|
 |
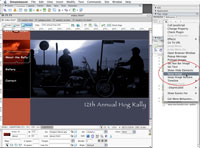
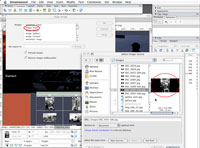
- click the Behaviors button,
- click the + icon to access the drop down menu, select Swap Image
|
 |
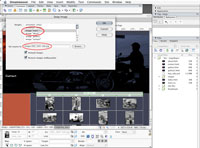
- in the Swap Image window, select the image "main ", then click Browse... to set the source
|
 |
- browse to the images1 folder and select the image you wish to swap, in this case, 01.jpg
- click Choose
- Make sure Preload Images is checked (this will start the images loading when the page loads) and Restore images onMouseOut may be checked or not (this will load the original images when the mouse is moved off of the swapped image)
|
 |
- you're swap image is now complete! Verify that the behaviors are listed in the Tag Inspector as per the example below
|
 |
- File>Save
- File>Preview in Browser... select at least 2 different web browsers
- repeat steps 16 - 24 for the remaining thumb images
|
|