When you organize a "large" project for the web, containing bitmap-grahics (like Slide-shows), long mp3 sounds, or digital video files, it is very difficult to produce a single swf file that can stream from the server smoothly.
Since timeline needs to have all content of one frame before playing the next, having all content inside one project, with big demands of file-size on certain frames, could get the timeline stuck temporarily at problematic points.
Since the average bandwidth for a Broadband connection (DSL, Cable) makes our files become "slow travelers" though their pipes, We are looking for ways to ease out the process: sending "several briefcases instead of the one big suitcase" through the pipeline.
This is how the idea of Loading external swf files in a project comes to place:
Then build the different groups of content that define those sections: slide-shows, big Movie-clip symbols, high-resolution bitmaps, long sound-files and movieclips, in independent fla files. You will create a script in the main movie that will LOAD the external swf inside the main file and display its content. Using this trick you will use smaller files that will get loaded, only if the user clicks on a certain button (demands a specific content) and you will create a smoother interactive experience.
|
 |
IMPORTANT FACT:
The external swf (for example your slide-show) does not carry the background color when it gets called inside a Main movie.
If the content exceeds the Stage area ( a text moving across the Stage from side to side, an animation into the detail of a big image) you will see the elements outside the Stage area too.
This is confusing because swfs, when played by themselves, don't show anything placed outside the Stage area.
if you think about it, it is behaving like any other Movie-clip symbol inside the project: it has come back to be a child of the Main movie when loaded through the script.
|
||||
The file Movies_adinkra_band.swf has a white background, the text and bubbles excede the size of the Stage but we only see the Stage area. Reload the whole web page to see again the animation. |
The file Movies_adinkra_band.swf used here contained a mask the size of the Stage that masked every layer in the movie. |
Positioning your external movie on the Stage of the Main one
There are 2 different ways of "placing" this external swf file in your Main Movie
1.You can place it directly on Stage: aligned to the point 0,0 of the mainfile (that is the upper left corner of the main Stage).
2. You can load the external movie INSIDE A local Movie-clip. This gives you very good control for the positioning of the external movie on Stage because the local movieclip defines exactly where the external will be placed.
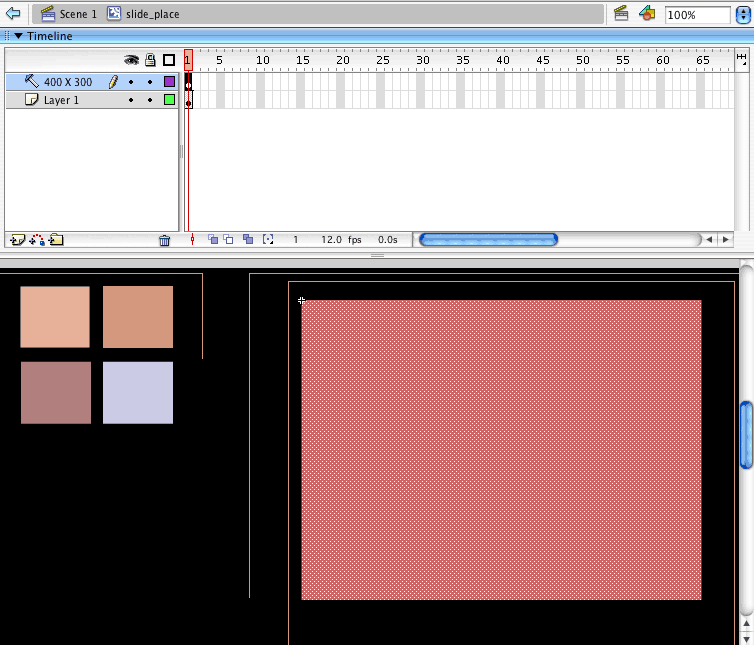
This movie needs to be present on every frame containing the loading code. You can reposition it on each case. Notice that ActionScripting takes the upperleft corner of the movie as reference for positioning. When looking at the Stage, you will see a little cross contained in the mc: that is the reference point of the symbol. Do not confuse with the little white circle used for rotating and scaling. The cross is inside the symbol. |
Those 2 methods have only a slight variation at the end of the code when you addChild (loader)
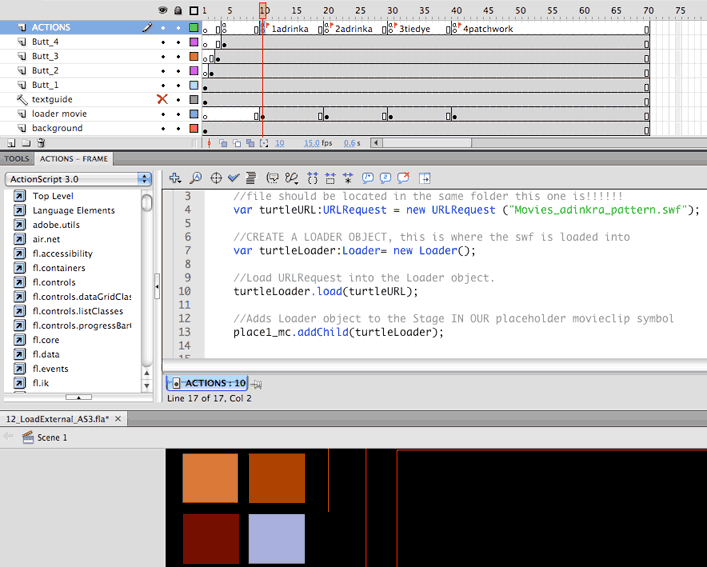
Next you see the code for loading an external swf inside a local movieclip that acts as a host:
|
||||||||||||||||||||||||||||||||||||||||||||||||||||||||||||||||||||||||||||||||||||||||||||||||||||||||||||||||||||||||||||||||||||||||
STEP 1. ANIMATING NATURAL |
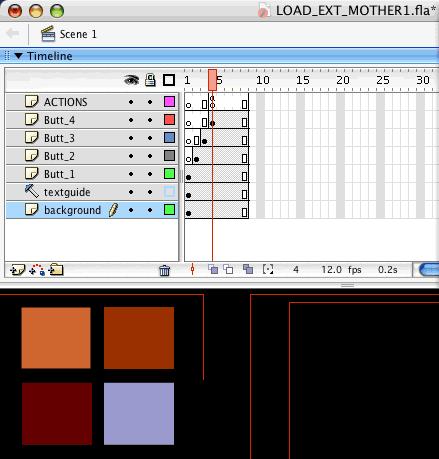
This is the content of the Main movie. There are 4 buttons, each one inside it's own layer, and some design elements in the layer called "background". Notice that each button appears on a consecutive frame. This is an example of a good structure that produces a "Natural loading" sequence. This is specially important when the buttons contain bitmaps on any State, inside them. |
|||
|
||||
STEP 2. BUILDING |
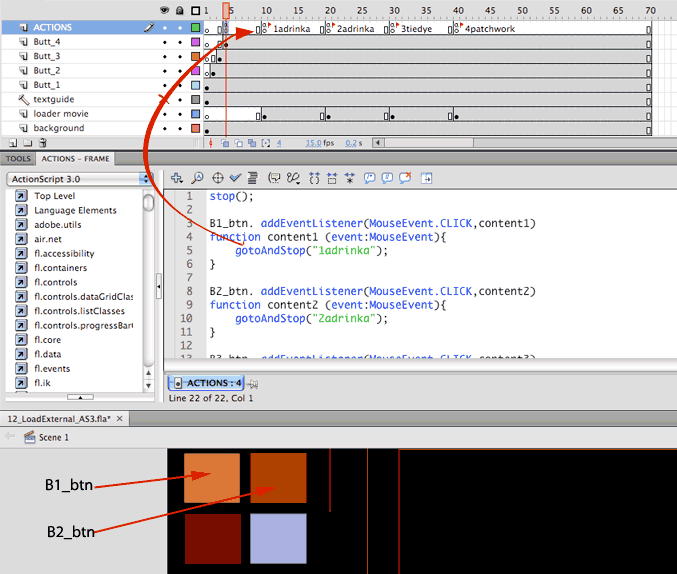
The main Timeline is going to have 4 frame-labels, corresponding to the 4 Sections in this movie. This is the local Movie-clip that is going to act as the recipient of the external swfs. |
|||
 |
||||
STEP 3. TIMELINE |
We program the buttons so each of them takes the user to the right framelabel on the Timeline. |
|||
 |
||||
STEP 5. THE LOCAL
place_mc |
This is how the local Movie-clip symbol is constructed. The colored rectangle inside should be the size of the external file. It should be placed to the right and down of the LITTLE CROSS that defines the center of the symbol. |
|||
 |
||||
STEP 6. THE LOADING |
The button will be in charge of taking the play-head to the Frame-label. Once there the "host movieclip" (place_mc)will be available and we will call the external movie from an Action attached to the Frame that holds the Frame-label. See explanation of code below. |
|||
 |
||||
|
||||
| STEP 8 | Add the loading code to each one of the Labeled frames. Each keyframe should call the proper external movie inside our local Movie-clip.
|
|||
