Dot Syntax is a formatting convention to create quick and efficient phrases that refer to buttons, movie clips and other objects.
The “dot” • is used to indicate the properties or methods related to an object (there is no space in between the elements and the dot)
It will be written like this:
|
WHO: is the INSTANCE NAME of your button or movie. WHAT: The Action that you want it to do/ The property that you want to reset/ The Method to apply ; or semicolon marks the end of a statement (just like period marks the end of a sentence) |
It will be written like this:
|
|
|
Remember that to have this code working you need to:
1. Name the button's instance "spain_btn" through the Properties panel.
2. Make a keyframe in the ACTIONS layer, write a Stop action and then this code (let's say, on frame 1).
3. Have the button actually on that frame present on Stage (on frame 1).
|
|
|
Event handler: on (press) Event Method: onPress |
|
To Build our Interactive map, we will have to create a basic interface, with all buttons ready to be pressed.
The interface will be generally built on frame 1, or wherever you want to place the Stop action that allows the user to choose.
It is important to organize the content on layers, specially the ACTIONS, BUTTONS and CONTENT layers.
CREATING TRANSPARENT BUTTONS
If the artwork for the map cannot be separated (you are working with a bitmap graphic containing the map artwork) you might want to create "transparent buttons",
with no artwork placed on the UP stage of the button.
BUTTONS WITH REMOTE ROLLOVERS
A remote rollover is an html concept, applied to a situation where the artwork for the rollover is not placed on the same location than the artwork for the hot-spot over the page.
Special javaScript code is needed to have this structure working on the html page.
It is very easy to create something of this type in a Flash-button, all you have to do is place the artwork for the rollover Stage in a different area than the artwork for the up stage of the button.
I recommend that you create a layer out on the Stage, defining where are you going to place all the button's rollover content (like a square or a line guide that you will erase later).
Then double-click each button on the Stage to edit the content maintaining a visual reference of the Stage. Reposition the artwork on RollOver so it always matches the same position on Stage.
This way all the rollOver content will be placed on the same area of the Stage,
and your interface will be easier to understand.
Notice that placing content on rollover is an opportunity to give some information, not just a fancy-looking feature.
In good interactivity you divide the content of the button between the UP, rollover, even the down Stage, to clear out the interface.
You should still keep some other part of the content (the bigger in file-size) reserved for when the user actually presses the button. That part of the content will be placed in the content area.
CONTENT LAYER
In a good interactive map the main interface never disappears, so your options for clicking and coming back to another section remain always open.
There are some exceptions to this rule, in cases where you want to animate even more the transition from one section to other, but in general a BACK button is a poor idea that indicates
linearity and a single route through your content (not good).
For this reason, the content that appears when you click the button, should be placed only on a certain part of the Stage.
When you want to place more content that a simple graphic symbol, you should build the content inside a movie-clip and let it loop or create a Stop action at the end of the animation INSIDE the movieclip.
Since we are going to write the Action Script for your buttons, inside a frame-action, all the scripting for the buttons will be placed in one location.
Classical programmers love this way of structuring the file; this way they don't need to find the buttons and select them one by one to find the code.
It will be also easy for you to check all the code in one glance.
We will use Frame-labels instead of frame numbers in the code:
aaaaagotoAndStop("Peninsula") ______Instead of______ gotoAndStop(10)
Remember that the frame-label needs to spelled exactly the same in the label (through the Properties panel) than in the code.
The frame-label gets written within quotes in Action Scripting.
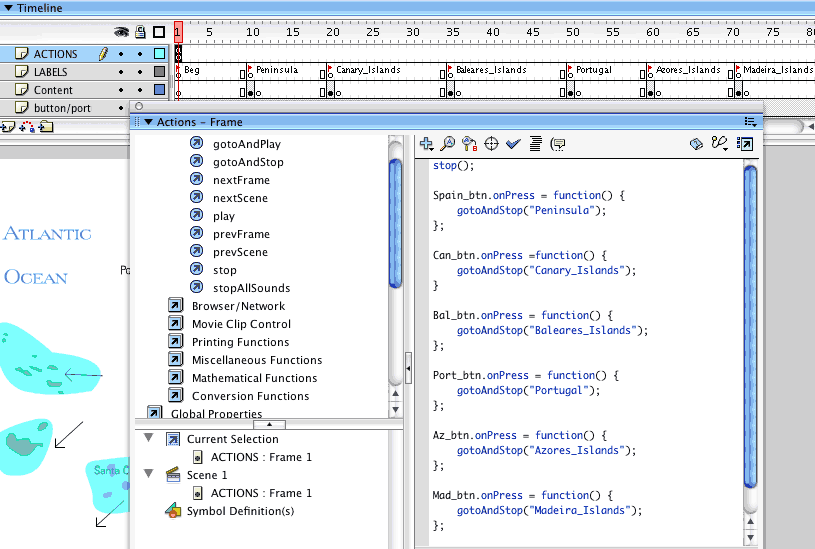
Example of Dot syntax in the Actions Panel. Notice the selected Keyframe in the 'ACTIONS' layer.
 |
la |
Play first Then experiment with Press and Rollover |
||