Steps involved in the design process
1. Understand the goal of the client and deciding the formats that will work best for this specific project; print, web, ipad etc.
2. Gather information (research to be included in the Design Brief)
The research will help determine the concept you will use in your ads.
3. Decide on your concept and clearly write a description to discuss with your client.
4. Gather images that work with your concept.
5. Creat Thumbnails to get many different layout ideas.
Think by sketching and writing to better explain your ideas/layouts.
6. Create Roughs
Choose your best thumbnail sketches and turn them into roughs.
Roughs should be full size and be done in color by hand
or on the computer.
7. Critique your roughs
Choose your best 2 roughs and discuss your concept, images, colors and type used in the layouts.
8. Choose best rough, create a finished layout/comprehensive (comp)
9. Comp is okayed by client after final changes have been made.
10. Deliver files to printer. |
General Rules
Remember: a brilliant project completed after the deadline may never see the light of day.
• Don't let bad design hurt great content.
• Be prepared to makes lots of revisions.
• Start with the big concept, and work through until you've eliminated all of the mistakes.
• Don't forget that concept and content are everything.
• Be consistent, help the reader recognize, identify, and comprehend different types of information.
• Remember that design is evolutionary, turn mistakes and accidents into opportunities.
• Don't be deluded, great design can help bad content, but only for a while.
• Have someone who represents your audience review your materials.
• Remember, "I like it.." is not a reason to include it in your design.
Logic, clarity, and meaning should drive the design.
• If you really want to be different, do it right.
|
|
Design Brief
• Understand the problem
• Gather information
The goal of the design brief is to outline the company's needs, target audiences, and client's expectations as clearly as possible.
The BRIEF is GENERALLY prepared by the cloent if you are working with a large company.
The brief outlines the problem to be solved, expecting the designer to provide a creative solution.
The brief does, however, articulate limits.
The limits typically are structural and have grown from the company's vast experience with the way promotions are used in the field and with what has worked in the past.
The company is heavily involved in the production process.
The Brief mayalso include other promotions and competitive promotions to show what it likes and doesn't like.
Company design briefs differ, depending on the type of project, but they always spell out expectations as clearly as possible and describe the audiences that have been targeted. |
Things to be included in the brief:
• Product or company history depending on the project.
• Product or company potential. What are the opportunities for growth?
• Key Audiences.
•Product or company attributes & end uses. Everyone claims to make a quality product or have a quality company. What sets this one apart?
• The Competition. Designers are expected to do their own research into a product's competition and understand how the company's brand fits into the competitive landscape.
• The Marketplace. What is the market environment awaiting this product?
• Budget. Designers are responsible for coming up with a concept that can fit within the budget. The company manages budgets closely.
• Delivery: Clear, explicit instructions are always given on delivery dates and conditions.
If your client is a small local company, you as the designer/art director, must prepare your own brief in the form of questions to ask your client at the first or second meeting.
Do your research about the company BEFORE your first meeting so your prospective client knows that you are interested in them. |
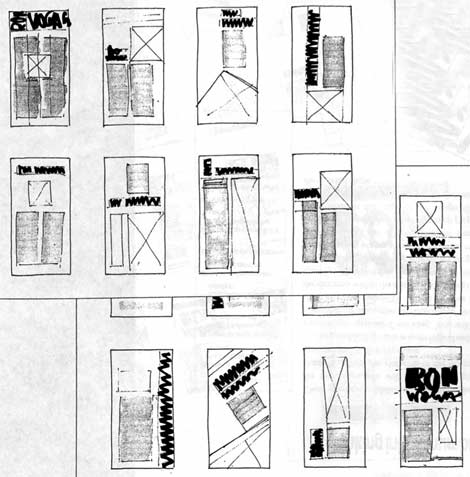
THUMBNAILS
• Think by sketching (and writing)
• Choose your best thumbnail sketches and turn them into roughs
Confronting a blank page can be an intimidating task for a designer. Thumbnails make the task simpler and more achievable by planning and knowledge.
Things to know before you start designing:
(information from the design brief)
• what is your message?
• who is your audience?
• what format will best communicate the message?
• understand and implement the design principles
...... alignment
...... contrast
...... flow
...... emphasisi
...... unity
Small, quick, proportional, exploratory sketches created by page designers in order to rapidly generate and capture ideas. They are the visual proof of the thinking and analyzing process.
They don't have to be pretty or refined.
They MUST be legible and on plain white paper. |
|
Once you have created many thumbnail sketches on a page, you pick and choose pieces and parts from them, which, if needed, may be recombined into better thumbnails. Many beginner designers are tempted to shortchange this step, but it is VITAL for long term development of the creative muscles.
Thumbnails are an essential part of the design process;
- the more you do the stronger your creativity will become
- the more visually interesting your page designs will be.
PROCESS:
• Begin creating thumbnails on a clean 8.5x11" page.
• Be sure to know what your final proportions will be....
i.e....2:3 ratio portrait (4x6") newspaper ad
.......3:1 ratio landscape (24"x8") brochure
• Draw several proportional shapes on the page
....these boxes should not touch
• use boxes to represent graphic elements
• use lines to represent type(body copy)
• hand letter headlines and indicate serifs, and style(bold, italic)
• create a minimum of 12 different laouts
• Remember the cliche'....you can't put a round peg into a square whole.
If you are designing a business card all your thumbnails will be in a proportional rectangle.
|
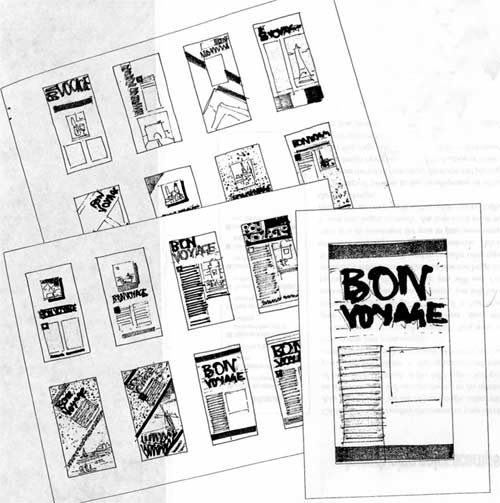 |
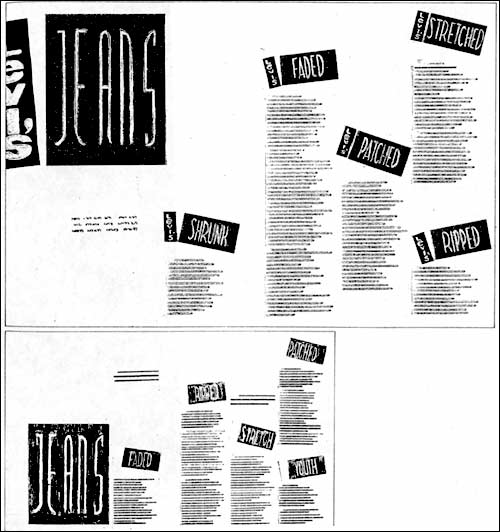
5. ROUGH: can be done by hand or on the computer
When your minimum number of thumbnails are complete, choose the best three and begin to layout your design, at the correct size, on the computer. These should be well designed but do not spend hours in perfecting them at this point.
Be thoughtful in choosing type.
Think about the design principles. Which ones did you use? |

|
6. CRITIQUE:
Print out these roughs to show to your client.
This is actually a critique of your work by the client.
7. FINAL COMP: the finished comprehensive
After you and your client have choosen the best overall design, refine point size, colors etc. This becomes your final or finished piece which will go to the printer.
8. Client okays design
The client should "sign-off" on the design.
Their signature indicates they accept this specific design and the contents and spelling etc. are correct.
6. Production and prepress issues are resolved
7. Files go to printshop or the web |
|