GDP 111 - Resolution Color Exercises
To successfully convert a digital raster image from rgb to process color using photoshop.
To place a raster image in Indesign
To change the resolution of an image appropriate for printer specifications
To save the image in the correct file format.
Getting Started
To get started, work through the Photoshop Basics Tutorials in the "software help" area of Moodle in Unit 10
Note:
LPI (lines per inch), halftone line screen and linescreen are interchangeable terms and is the number the printer uses to determine the correct amount of resolution needed for the Photoshop image.
The resolution will be determined by your printer BEFORE you begin designing. In this assignment you will determine the correct resolution using the LPI providedfor each image. Keep in mind LPI refers to the OUTPUT resolution while PPI refers to the INPUT or monitor display resolution. The PPI is always double the LPI. (150 lpi x 2 = 300ppi)
How to Convert Your Images from RGB to CMYK in Photoshop:
It is easy to change the color mode to CMYK in Photoshop. Simply go to >Image>Mode and pull from RGB to CMYK Color.
To create process color in InDesign:
Select the item you want to apply the color to >go to the color panel>click on the small arrow in the upper right of the panel where you will then see a drop down menu>select cmyk>use the sliders to choose the color mix.
You can also mouse over the color bar at the bottom of the panel and an eyedropper will appear. Use the eyedropper to click on a color in the bottom of the color panel. To save your color choice open the swatches panel and drag the color square at the top of the panel into the swatches panel. (Make sure it captures the color as cmyk.)
Directions:
1. Download the "jpeg" image files provided in the assignment area of Moodle to begin this exercise.
2. Open each image in Photoshop and prepare it by following the directions below.
3. Open an Indesign document 8.5"x11” and PLACE each prepared image.
4. After you have changed each image per directions and placed them in Indesign, copy and paste the following information next to or under each of the 3 images in your Indesign file and fill in the info.
- final resolution ________ ppi
- final image file format _______________
- final color mode _______________
- # of color seps _______________
- final width _______inch and final height ____inch
5. Preview your Indesign doument to be sure you have converted all of your images to CMYK. Always check Window>OUTPUT >SEPARATIONS to be sure you are using only the CYMK color separations.[Separation Preview video tutoria].
6. Package the Indesign document.
7. Export as PDF.
To check the PDF has the correct separations open Acrobat Professional CS4 and go to advanced>print production>ouput preview.
8. Upload PDF to Moodle.
________________________________________________________
Operator1.jpg — 50
points
• The printer is using a linescreen of 85.
1. Select the correct resolution for a full color image file to be printed in a magazine ad.
2. Change the height of the image to 5.25”.
3. Change the image mode from rgb to cmyk (image>mode>cmyk)
4. Save as either a native .psd file or as a .tif and PLACE on page 1 in a new Indesign document.
5. Add a 4 point stroke to create a frame with a PROCESS color. (Only the 4 process colors should appear in the Separations Preview, NOT PANTONE SOLID)
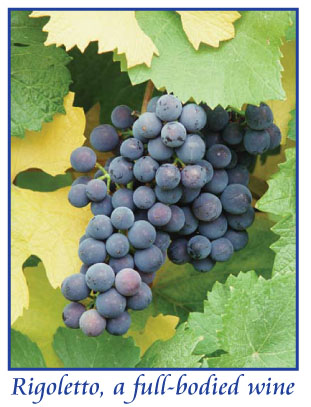
Leaves.jpg — 50 points
• Image will be used for a slick, full color brochure. The image needs to be cropped to 4” wide x 5”high, with the grapes as the focal point.
• The printer is using a linescreen of 133.
1. Select the correct resolution for a full color image file to be printed in a full color brochure.
2. Change the image mode from rgb to cmyk (image>mode>cmyk)
3. Save as either a native .psd file or as a .tif and PLACE on page 1 in the Indesign document.
In Indesign add a 3 point frame and choose any process color.
• Add the following text under the photo as a caption.
COPY: Rigoletto, a full bodied wine
COLOR: any process
(Only the 4 Process colors should appear in the Separations Preview, NOT PANTONE SOLID)
Choosing the process colors will allow the file to separate as CMYK.

Sample of photoshop drop down menu to change color mode
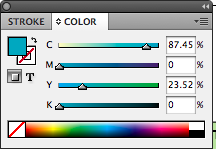
Use the sliders to choose the color mix.
Examples: