![]()
Scanning Using the Epson Perfection Scanner in The Digital Arts Center
Scanning
Teaching Scanning without a scanner by your side is like teaching driving without a car or cooking without the ingredients!
This link is to give you an overview of scanning.
![]() 1. An Epson Perfection scanner is available in the DAC lab and in A-171 for student use. Consider how you will save your scanned image and what media (in addition to Xythos — such as an ipod or flash drive) you will use to remove the image from the computer and back-up your file.
1. An Epson Perfection scanner is available in the DAC lab and in A-171 for student use. Consider how you will save your scanned image and what media (in addition to Xythos — such as an ipod or flash drive) you will use to remove the image from the computer and back-up your file.
2.Place your first image to be scanned at the top righthand corner of the scanner.
3. Open Epson Scan. Two windows will appear – a preview window in which you can see a preliminary scan of your image, and an options screen. The scanner will automatically display a preview image – a preview image gives you a quick view of how your image will look once you select certain options and scan. Your preview image is not your final scanned image.
4. On the options screen, check the mode to make sure that you are in Home Mode or Professional Mode
5. The “Scan” button is highlighted in blue. Before you scan, you must tell the program where you would like to place your scanned images. To the right of the “Scan” button is a narrow blue button with up and down arrows. Click on this button and go to “File Save Settings.” A new window will appear and at the top you will see a section labeled “Location” – select the “choose” button. Scroll all the way to the left to first find the firewire drive, then your folder with your name. Click once on your folder with your name. Select the “New Folder” button and create a folder named “Scanned Images.” Click on the “Create” button.
6. Click once on this new “Scanned Images” folder and select the choose button.
7. In the “Image Format” section, make sure that “TIFF” is selected as the file type. At the bottom right corner of the window, select the “OK” button. You will be returned to your two original Epson Scan windows.
8. In the options window, insure that you select the proper image type – in this example, we are scanning a color photograph, so we will select “photo” and “color.” If you change image type, note that your preview image will change as well.
9. Another option to consider is image resolution. For the purpose of this project, suggested resolution is 300 dots per inch, or dpi. Most other screen settings can be left as they are. Image editing using iPhotoe will be discussed later in this tutorial.
10. Once you are pleased with your settings, go to the preview screen. You will need to select the area of your image that you wish to be scanned. Use the marquee tool to draw a rectangle around that area.
11. You are now ready to scan. Select the highlighted blue scan button. Your image will be scanned and stored in the “Scanned Images” folder you created in your iPhoto Library on the firewire drive. Remember, record and keep the number of the firewire drive you are using so that you are able to find your images should you have to stop this process and return later. Once Epson has completed the scan, you will be returned to the preview and options window.
12. Place another image on the scanner and select the preview button. Continue scanning images as necessary.
13. Once you are finished with your scans, close Epson Scan

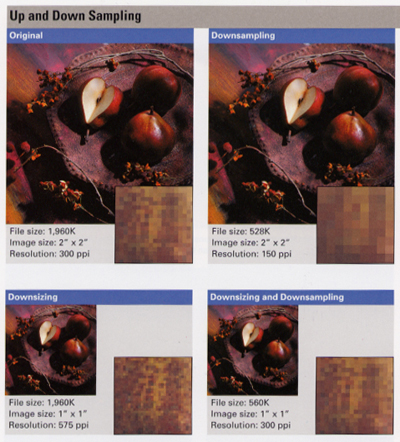
Up and Down Sampling after Scanning
Most image processing programs (Photoshop) provide ways to change the resolution of your file after you have scanned it:
- downsampling will reduce the resolution. When you downsample (or decrease the number of pixels), the software simply throws away the pixels it doesn't need.
- upsampling (increasing the resolution) will increase the resolution.
When you upsample, (or increase the number of pixels), new pixels are added based on color values of adjacent pixels. This is called interpolation.
Interpolation allows you to create greater image resolutions that your scanner is capable of producing.
Interpolation can tend to blur the image.
If the file has more resolution than you need for your printing method, it also allows you to discard extra pixels to reduce the image file size.
Resizing an image will also have an effect on the image file's resolution.
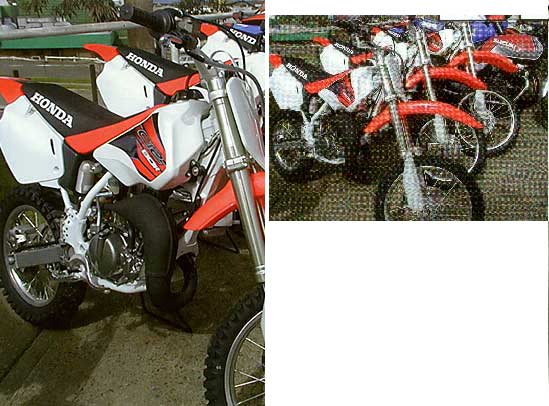
Moire Patterns in Scans
Undesirable patterns, fine herringbone or crosshatched pattern, in the light areas of images which are offset printed(magazine images) and are being rescanned.
Moire Patterns are caused by interference between two sets of fine pattern grids, in this case, the scanner cells(pixels) and the halftone screen in the printed piece.
Moire Patterns can be avoided only if you scan at a higher resolution than the printing screen.
When scanning an image from a book or magazine, this image is already a halftone.
To prevent a moire pattern,
1. scan the image at at least 2x the finished size you need.
2. In Photoshop, reduce the image to the correct size in Image Size box
3. In Photoshop, use the median option to get rid of the artifacts.
4. In Photoshop, Unsharp mask to get the best sharpness.
OR
1. scan the image at 2x the resolution you need.
2. In Photoshop, reduce theresolution to the correct size in Image Size box
3. In Photoshop, use the median option to get rid of the artifacts.
4. In Photoshop, Unsharp mask to get the best sharpness.
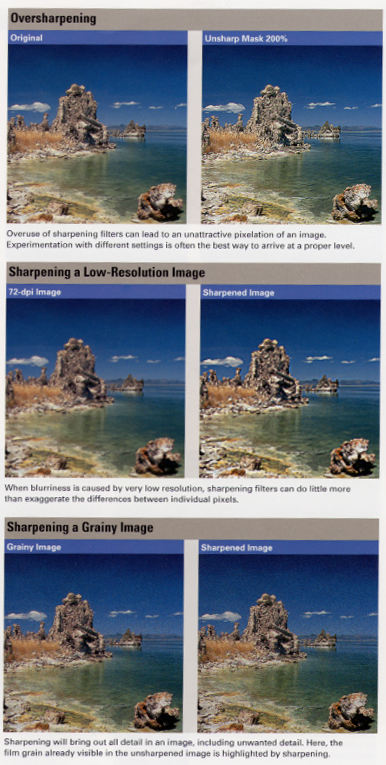
Oversharpening after Scanning
The scanning process may cause some loss of detail and edge definition in an image. To correct for such softening, some scanners have automatic sharpening routines built in.
Most often, however, you will need to sharpen the scanned image using sharpening filters found in the scanning or image-manipulation software.
The most common filters are called sharpen, sharpen more, sharpen edges and unsharp mask.
Sharpen and sharpen more sharpen the entire image (of a selected portion of it), by increasing the contrast of adjacent pixels.
Sharpen edges and unsharp mask increase contrast only at the image's edges, or areas in which lines of different colors meet, preserving the overall smoothness of the image but increasing object definition.
For photographic images, unsharp mask is the most effective sharpening filter. (The others are more often used for line art.)
Unsharp mask is designed to create lighter and darker areas on each side of an edge.
Unsharp mask tools generally offer controls for adjusting the degree of contrast (the 'amount setting'), the area on each side of an edge that will be affected (the 'radius'), and how different adjoining pixels must be before they are affected ('threshold').
Using high settings or repeating the unsharp mask operation could oversharpen the image, resulting in a halo effect around edges.
The unsharp mask filter is also useful when an image has lost definition during resizing. (During resizing, the software may create extra pixels by interpolating between adjacent pixels, thus softening the image.)