|
 |
|
G
D P 2 0 9 - P h o t o I I
Tuesday's
- 8:00am - 12:50pm / Classroom
- OE 184
Linda Lowell
- GDP, Photography Chair
Course
Outline
Jump
to THIS WEEK
|
| |
DAC
Lab Site
Fonts for Mac and PC
|
|
Week #1: 1/22
|
• Intro
• Visual Grammar - SEE (objective/formal); THINK (cognitive/story
telling) and FEEL (emotions) -- there are no new subjects, great photographs
are RESTATEMENTS WITH A DIFFERENCE.
• John
Szarskowski's great photograph: Grace, Economy, Tension, Balance, Visual
Wit, Surprise.
• Visual
Interest + Concept + Emotional Response = MEMORABILITY
• Big
'MAC' Theory - Mystery, Ambiguity, and Contradiction.
Homework: Due 1/29
Reading: Nature
of Photographs - Part I
Creative
Choices (see Course Outline)
Photo Assignment:
1. Sacred
Geometry (Hardware Abstrations) Taking something ordinary and
illustrating it with extraordinary vision. Ordinary objects (especially
utilitarian things) bring a certain set of expectations. Think differently.
|
|
Week #2: 1/29
|
Lecture:
Nature of Photographs - Part I and II
• Depictive Levels: flatness, frame, time, focus
• Cognitive Perceptions (Mental Level)
• Formal (physical) vs. Narrative (story)
Homework:
Due 2/5
Reading
Nature of Photographs - Part II
Photo Assignment
2. Surprise
Bag - Restatements with a Difference.
• High
Impact
• Quick
Read
• Clever
Reject
your first concept - others will have thought of it too.
Sample
'Word List' Questions:
1. What is it?
2. What is it's opposite?
3. Where are there associations between lists?
4. Where are the contradictions?
5. Which choices provide the strongest visual opportunities?
Avoid
literal, predictable solutions!
|
|
109
RATIO LANGUAGE . . . . . . . . . . . . . . . . .Week #3: 2/5
|
Lecture:
- SCANNING
- DAC SERVER
- INTRANET
Lab: Scanning / Servers
Homework
Reading
Copyright
& Registration
Issues (online)
Photo Assignment
None - 'get
outta jail free' this week.
|
|
Week
#4: 2/12
209
RATIO LANGUAGE . . . . . . . . . . . . . . . . . . . . . . . . . . .

|
Lecture:
- Global Village website - promotional collaborations
• PORTRAIT
LIGHTING PATTERNS (slide
show)
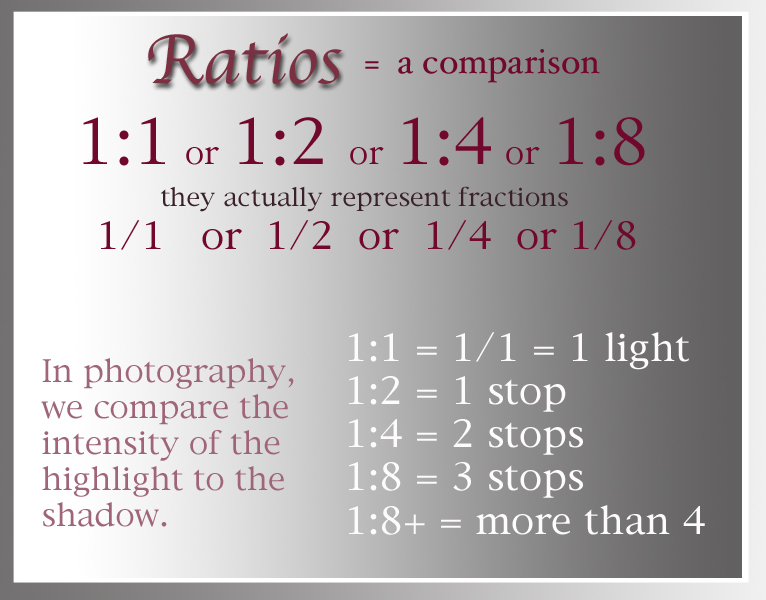
• RATIOS
• LIGHTING
& CAMERA DEMOS
Lab:
SCANNING
Homework:
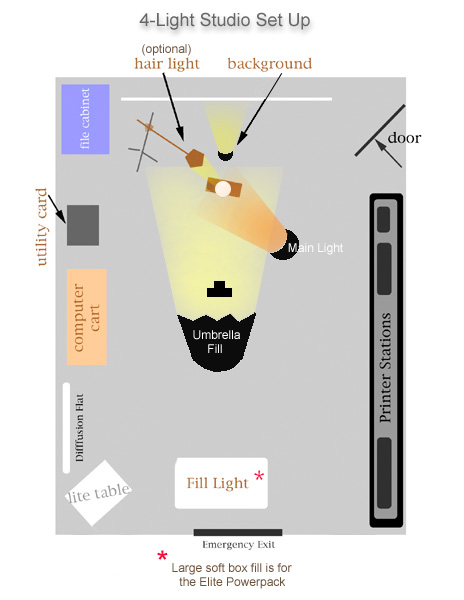
• DAC
PHOTO STUDIO
• Camera:
CANON D-30 (download to your CD)
Shoot Portrait
Lighting Patterns
(nine shots each - partners of two); using the Travelkit Lights
(2 heads, stands, umbrellas)
#1-#6 - SPLIT,
LOOP and REMBRANDT in both BROAD and SHORT styles
# 7 - Paramount
#8-#10 - two
lights (show 2 different ratios: 1:5 and 1:9)
|
|
Week
#5: 2/19
|
Lecture:
PORTRAITS REDUX, REDUX, REDUX...
• RATIOS
• LIGHTING
EQUIPMENT DEMO II
• METERING
• CAMERA
EQUIPMENT DEMO II
• DOWNLOADING
IMAGES TO CDs
Lab:
Scanning Assignments #1 and # 2 (place in DAC server - Week 5 folder)
Homework:
Due 2/26 - on CD or Zip
Photo: Reshoot
Portrait Patterns and Download to a CD
Shot
List for
Portrait
Patterns Assignment
(ONE LIGHT
- NO UMBRELLA)
1 .Split-Broad
- 90 degrees (from nose) camera L or R; camera height at head level.
2. Split-Short
3. Rembrandt-Broad
- 45 degress (from nose) camera L or R; camera height above eyes
4. Rembrandt-Short
5. Loop
- Broad - 30 degress (from nose) camera R or L; camera height
above eyes; shadow falls middle of frenum.
6. Loop
- Short
7. Paramount
- 0 degress (from nose); camera height high, shadow falls middle
of frenum.
8,
9, and 10.
Three lights (main, key, background).
Work to produce a flattering, complimentary likeness. Natural expressions,
'life' in the eyes ("the eyes are the soul of a portrait"),
anticipate 'real' moments (not forced).
8. Loop
- Short - 1:5 ratio
9. Rembrandt
- Short - 1:9 ratio
10. Split
- Short - 1:3 ratio
|
|
|
Lecture:
1. New 3-Light Travelkit (2 umbrellas and one softbox)
2. Poster Project - Best of Sacred Geometry and Surprise Bag
3. Review Ratios
4. Quiz #1
Lab:
1. Download Images from DAC server or Apple Share - Favorites from Sacred
Geometry and Surprise Bag. Combine in a 24x30 poster.
2. Work up design from
72 dpi files
Homework:
Due
- 3/5
reading
1. Handouts: Digital Elements
2. f/stop
scale - in 1/3 stop increments (see slide
show)
photo:
1. Small Book Project based on one
of the following themes:
...............Leaves
...............Spools
...............Utensils
...............Eggs
...............Brushes
2. Book images next week (minimum of 10 images)
................lab time will be for printing images
3. Book design the following week
|
|
Week
#7: 3/5
Announcements:
Spring
Showcase Poster Contest
Photography Categories (Coveted SoMA's):
Photojournalism/Editorial
Portraiture
Fashion
Landscape
Fine Art
Abstract
Underexposed
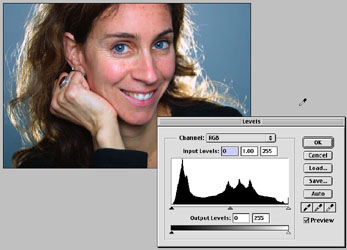
Histogram ... Levels Corrected Histogram
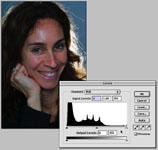 
Normal
Exposure = Robust Histogram = Good Print Potential
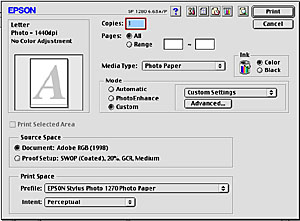
File>Page
Setup (command/shift/P)
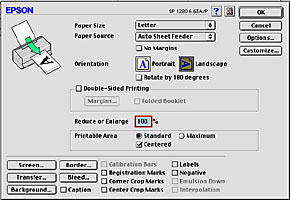
Custom...Advanced
Window
|
Lecture:
Output Control
1. Digital output quality is dependent upon 4 things;
a) Original Exposure (traditional or digital capture)
b) Scan Quality
c) File Management
d) Printing Parameters
2. In Photo
I, you learn Exposure Control - how to expose normally (N) and
what intentional over and under exposing (-1, -2, +1, +2, +3, +4) delivers
in terms of 'emotional value' and narrative content (under = moody,
menacing; over = airy, ethereal, even other-worldly).
• In Photo II, we concentrate on translating our Creative Intent
into excellent printed output for portfolio production.
3. LL#1
. . . Quality In = Quality Out
a) Expose Normal / Scan Normal (MASTER ARCHIVE FILE)
.....create over/under effects in Photoshop
b) Check for Robust Histograms
.....continuous tone images should produce 'full' histograms; if not,
rescan
c) Purpose your MASTER ARCHIVE FILE for RGB desktop printers: Image>Image
Size
..... 300 ppi / 24MB file size for 8-1/2" x 11" photo
paper.
d) Minimize Information
Loss during Image Manipulations
.....don't over adjust levels, curves, HSB, color balance, USM, etc.
e) Assign Proper Color Space - Adobe RGB 1998
.....Image>Mode>Assign Profile>Adobe RGB 1998
.....This allows the monitor preview to match output very closely.
f) Assign Proper Printing Parameters (see Lab)
.....Command/Shift/P (for page setup); Command/P (for print)
g) All digital prints require subtle sharpening
h) All images for the web require optimized sharpening
i) Sharpen as a Last
Step Before Printing (see USM #1)
Lab: Printing Parameters w/in Photoshop
To create a print that matches what you see on the monitor:
1. Select Page Setup - Command/Shift/P or File>Page Setup
.....Orientation: Portrait (Standard) or Landscape (Centered)
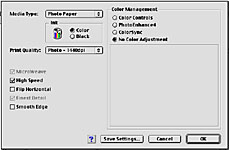
2. Select Print - Command/P or File>Print
.....Media Type: Photo Paper
.....Ink: Color
.....Source Space: Adobe RGB 1998
.....Paper Space:
..........Profile: Epson Stylus 1270 Photo Paper
..........Intent: Perceptual
.....Mode: "Custom" ... Click Advanced ... in new window check:
..........Color Management: click 'NO COLOR ADJUSTMENTS'
..........Media: Photo Paper
..........Print Quality: 1440 dpi
.....Click "OK"
..........Double check printing settings (in box or upper left area)
.....Click "Print"
File>Print (command/P)
USM METHOD #1 - LAB
1. Flatten Image
.....Layers Window>[arrow] Flatten
2. Convert to LAB Mode
..... Image>Mode>LAB
3. Select Lightness Channel
..... Layers Window>Channels>Lightness
4. Select USM
.....Filters>Sharpen>Unsharp Mask
.....Amount: 125% / Radius: 1.5 / Threshold: 3
5. Convert back to RGB
.....Image>Mode>RGB
6. Print
Homework:
Due 3/12
1. Optimize
Small Book images for printing (USM method)
2. Produce Custom Small Book
|
|
Week
#8: 3/12
|
Lecture:
Outdoor Portraiture Guidelines
1. Flattering and complimentary
posing and lighting - it's all about the
face, comfortable (natural) expressions,
good lighting.
2. Four Popular Poses:
------a. Head
and Shoulders
------b. 3/4
Length
------c. Full
Length Standing
------d. Full
Length Seated
3. Use wide aperture selections and long telephoto lengths.
4. Meter for the highlight, control ratio w/reflectors as fill
5. Ratios between l:2 and 1:5 (1:9 for face shots only)
6. Find or Make Quality
Light - the 'edge of the forest' . . . foliage blocks overhead light
to create a main light source (direction).
7. Additive and/or Subtractive Lighting
8. Evidence of Catchlights
@ 11:00 or 1:00 (see Lisa's portrait)
Lab:
1. Saving the 'unuseable'
image and restoring it to 'useable'.
2. Finish Small Book Project
Homework:
Due 3/19
1. Shoot the four portrait poses above during class - D-30.
2. Download in-class Portrait shots and transfer to zips/CDs.
3. Create four-up file for next week.
|
|
Week
#9: 3/19

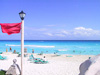
Click
here
for top image enlarged

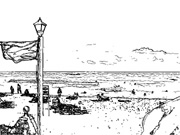
Click
here
for bottom image enlarged
|
 1.Original
Capture
1.Original
Capture
 2.
Specular Diminished
2.
Specular Diminished
 3.
Retouched
3.
Retouched
Lecture:
• SMALL
BOOK PROJECT DUE TODAY
• Improving Images in Photoshop
• Correcting Color Casts
• Retouching Imperfections
Lab:
• Work
with the image in Class Resources (DAC server)
1. Download 2 Color Images ("whiteShirt.jpg) (MrLee.jpg)
2. White Shirt Assignment - in class, correction color
3. Mr. Lee - take home for retouching -- facial imperfections, specular
highlights to the glasses, overall color improvement.
Homework:
Due
3/26
1. Retouch Mr. Lee (include color correction,
facial imperfections and specular highlight reduction in glasses).
Due 4/9
2. Environmental Portrait Session on Location
...............Shoot on Color Negative Film and Process to Photo CD
...............Create 10 final images, retouched and resized for print
...............Keep in mind good lighting, comfortable posing, and credible
expressions that flatter and compliment your subject.
|
|
Week
#10: 3/26

|
Lecture:
1. Outdoor Portraiture Critique
2. Making your own additive and subtractive devices
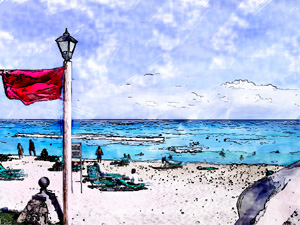
3. Corrections for natural light portraits
4. Vogue's SHAPE issue - see 'more photos' in "Eye...Beholder"
5. Line art techniques with photographs (like Vogue ads).
Lab:
1. Turn in completed "Mr. Lee"
2. Changing colors within subjects (GreenDress.jpg/DAC server)
Homework: Due Today
• FINAL SMALL BOOK PROJECTS
Due: 4/9/02
1. Outdoor Environmental Portrait Session (see 3/19 description)
2. 10 final images w/clean lighting, retouched & ready for print.
|
|
|
|
SPRING
BREAK
 , , , , , , , , , ,
SoMA
Showcase - May 24, 2002
click here
for
Submissions
/ Deadlines
|
APRIL
1 - 5
|
|
|
|
Week #12: 4/9
• The
power of Photojournalism and the Multi-Media Web Story
• National
Geographic - Sharbat
Gula after 17 years
• USA
Today article;
the photographer
Steve McCurry
www.photo-seminars.com/Seminars/PaintLight/Paintlight.htm
|
Lecture:
Exhibit Walk Thru with Pirkle Jones @ SB Museum of Art
11:00am we will meet at the museum and view the exhibit:
Pirkle Jones: A Retrospective
1. Painting with Light
Lab:
1. Printing contact images from Outdoor Portrait Assignment
2. Printing 5 finished proofs.
Homework:
Due 4/16 roughs / finals 4/23
1. Painting with Light Assignment
The objective of this assignment is to produce (1) environmental portrait
and (1) still life photograph using painting with light
techniques.
• Procedure:
First, select a dark room or nighttime outdoors location. Then, lock
open the shutter, and, in the dark, carry a flashlight around and literally
paint the scene with broad stokes. (Wear black cloths if you plan on
walking through the scene during your exposure.)
• Recommended reading: "The Lighting Cookbook" pp 123-125
• "Painting with Light" by Glen Gaffney
• Equipment: flashlight, color gels, scotch tape, tripod, cable
release, Cinefoil (to make a snoot for your flashlight), camera, and
ISO 100 film.
*** We recommend, bracketing exposures by selecting your widest aperture
( f 2.8, 3.5 or 4) and experimenting with shutter speeds of 30 sec.,
1:00 min. and 2:00 min. Your exposures may vary because of flashlight-to-
subject distance, flashlight brightness, and length of time you laminate
any one subject in the scene.
|
|
Week
#13: 4/16
Ansel
Adams Documentary
PBS Special
Sunday, April 21st @ 9:00pm
|
Lecture:
• Flash
Lighting Techniques - Sunset Conditions
Film: ISO 100
Portable Electronic Flash
Five Shots - one subject in the same pose for all shots
1. Meter for the sunset at the horizon (but not at the sun itself) and
underexpose 1-2 stops with your subject in place and NO FLASH firing.
This is a silhoutte shot of your subject with a 'pretty' sunset behind
them.
[flash unit is used for the next four shots]
2. Same ambient exposure for the sunset with a N (normal) exposure for
the flash-to-subject distance.
3. Same ambient exposure for the sunset with a N 'colorized' exposure
(with Rosco 1/4 Sun filter over flash; 1/2 Sun can be used also).
4. Same ambient exposure for the sunset with a -1 colorized flash.
5. Same ambient exposure for the sunset with a -2 colorized flash.
The #4 shot
above should look the most natural in simulating sunset quality lighting.
Tips:
• keep flash on the hot shoe (on the axis of the lens)
• don't shoot a composition further than 10-15 feet from your subject
• if you shoot at a lower camera angle, the sky values may no longer
record with vibrant color as the camera is seeing areas not close to
the horizon where you metered your initial exposure.
• try to accomplish the -1 and -2 flash exposures with either power
ratio control or TTL features in your flash (otherwise you need to calculate
new distances for each shot for flash to subject.
Lab:
• Portrait contact sheets & final prints
• SoMA Submissions
• Select final portfolio submissions
Homework:
1. Flash Motion Studies
at Sunset
|
|
Week
#14: 4/23
SoMA
submissions - due
5/8
Photojournalism . . . Fashion . . . Portrait
Landscape . . . Abstract . . . Fine Art . . . Still Life
YOU
ARE INVITED THURS. (APRIL 25TH) TO A MOON SHOOT:
Rod
Rolle (GDP 209 instructor)
will
be available for Moonlight Photography
at Butterfly Beach (Montecito - in front of the Biltmore Hotel)
with
his class shooting seascapes and rock formations from
10:15
to 11:00 pm
|
Lecture:
Moonlight Photography
• The objective of this assignment is to photograph a landscape
/ seascape or still life illuminated by the moon. Your nighttime photograph
must be produced within 4 nights of the full moon (4/26/02).
Exposure Settings
• The moon rises at exactly (plus or minus a few minutes) sunset
on the day of the full moon. The day after, moonrise is approximately
one hour later, 2 days=2 hours etc. The preceding days it rises 1 hour
earlier per day. The moon is virtually full on those 4 nights and you
can count on there being a consistent amount of light. The moon will
be at its brightest between 10 p.m.-2 a.m.
• Do not include the moon in your photograph.
• We recommend, bracketing exposures by selecting your widest aperture
(f 2.8, 3.5 or 4) and experimenting with shutter speeds of 30 sec.,
1:00 min. and 2:00 min. You can paint with light during your exposure.
Equipment: color gels, scotch tape, tripod, cable release, Cinefoil
(to make a snoot for your flashlight), camera and stopwatch. Safety
comes first, we recommend you work in groups for this assignment.
Lab:
• Continued work on portrait contacts and final prints
• Continued work for SoMA Showcase submissions
Homework:
Recommended reading:
• online: www.lostamerican.com/how/how.html
• textbook: “The Lighting Cookbook”, Theatrical Portraits
pp 66-69; Storytelling Photographs pp 90-93
|
|
Week
#15: 4/30
SoMA
submissions - due
5/8
Photojournalism . . . Fashion . . . Portrait
Landscape . . . Abstract . . . Fine Art . . . Still Life
click
and hold on image to open larger view
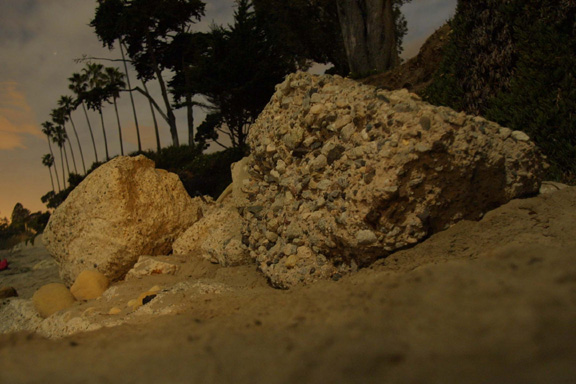
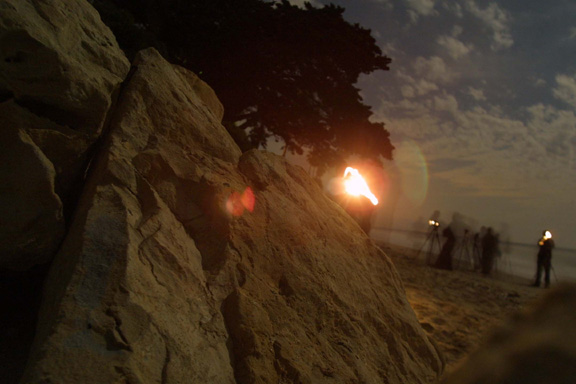 •
class photos • •
class photos • 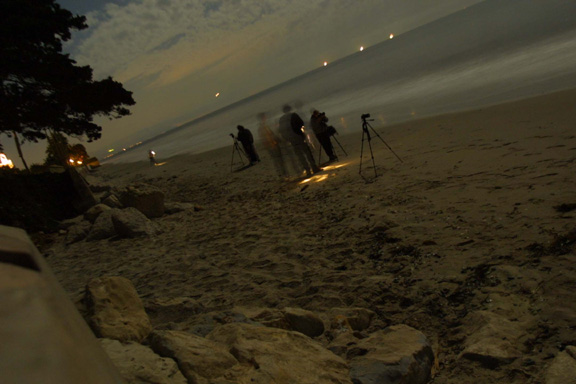
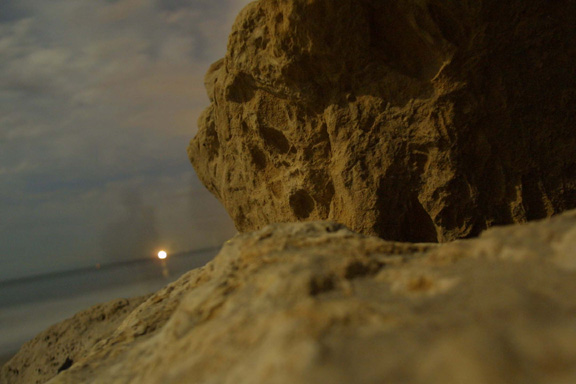
images by rod rolle
|
Lecture
• 10-Print Final Portfolio
Preparations
.......Edit and Spot (rubber stamp @ 200%)
.......Retouch (selective burn/dodge techniques)
.......File management for prints (300 ppi)
.......Paper selections (Epson only)
..............Heavy Weight Matte (all printers)
..............Premium Gloss/Semi-Gloss (870's/1270)
..............Lumijet Paper (Museum Parchment, Classic Velour)
..............Arches Watercolor 90# Cold Press
.......Portfolio options
• New Quad Ink Printer for true B&W output
.......carbon-based pigment (4 shades of grey)
.......Jon Cone Edition ink set
.......must get image approval; instructor operated.
Critiques
• Flash at Sunset Series (finals)
• Moonscapes (work in progress)
Lab:
• SoMA Submissions
• Select final portfolio submissions
Homework:
1. Moonlight Landscapes (last chance - finals 5/7)
2. Sleep Sonnets (due
May 14th) - you'll need:
.......tripod and wide angle lens
.......ISO 100 slide film
.......'T' setting or cable release for 'B' setting
.......widest aperture available (f/2.8 @ tuesday nite)
.......high camera angle - cover entire bed
.......open shutter w/room lights off
.......set alarm for 5:30am and close shutter
.......go back to sleep!
.......test exposures nightly until successful results
.......'clip test' at lab (re-use roll) |
|
Week
#16: 5/7
SoMA
SHOWCASE submissions
- EXTENDED
... ... NEW DEADLINE - FRIDAY (5/10) at NOON ... ...
Photojournalism . . . Fashion . . . Portrait
Landscape . . . Abstract . . . Fine Art . . . Still Life
|
Lecture:
• Sharpening
Techniques II
...............Lab Method
...............High Pass Filter
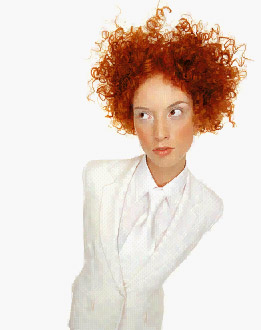
• Masking Technique (from the image itself)
1. From the DAC server, Class Materials Folder, get LA Sky and RedHairGirl
files.
............. Drag LA Sky file into RedHairGirl file creating a second
layer with both images - girl and sky (drag w/ commandShift).
2. Duplicate the background layer in this new file.
3. Drag the sky image layer so that its positioned below the girl image
layer.
4. Select the girl layer and go to Layer > New Adjustment Layer >
Channel Mixer.
5. Once in Channel Mixer, click on Monochrome (lower left of box).
6. Slide Red to approx. –130. Slide Green to approx. +200. Slide
Blue to approx. +25. Click ‘OK’.
7. Select Layer > New Adjustment Layer > Levels and pull highlight
slider to the left, midtone slider to the left (or right) and shadow
values to the right -- until you have good contrast between background
and model’s hair and figure (don’t lose fine hair detail).
8. Select ‘Select > All’
9. Select ‘Edit>Copy Merged’
10. Select ‘Channels’ in the Layers window
11. Select ‘New Channel’ (at base of window) --- the icon
looks like a document page. This will be called ‘Alpha 1’
by default.
12. Select ‘Edit>Paste’ – you should now have a
new Alpha Channel (mask) of the image you adjusted in Channel Mixer
previously.
13. Select ‘Select > Deselect’.
14. Now use the burn and dodge tools (selecting midtones, shadows or
highlights as appropriate) to selectively exaggerated the difference
in values between model, hair, and background. Remember to burn and
dodge selectively in Shadows, Midtones or Highlights. [Recommended percentage
is 30%]
15. Once ‘mask’ is all black and white, Invert it so the
model ‘area’ is all white and the background area is all
black.
16. Load this mask as a selection by clicking the Load Channel icon
at base of Channel window (dotted circle). [Another way to do this is
to ‘command click’ on the Alpha channel.]
17. Return to the Layers window and turn of the ‘eye’ icon
for the Channel Mixer layer(s).
18. Select the model Layer and ‘load’ this selection as
a mask. This is accomplished by clicking icon at the base of the layer
window that looks like a square with a circle in the middle.
19. Clean up mask with paintbursh and/or eraser tools.
20. Your done ... Yeah!
Critiques:
• Moonlight Landscapes (finals)
• Sleep Sonnets (work in progress)
Lab:
• SoMA Submissions (due tomorrow)
• Select final portfolio submissions (in class edit)
Homework:
1. Sleep Sonnets (cont.) -
f/8 @ Saturday
|
| |
SoMA
SHOWCASE submissions -
EXTENDED
... ... NEW DEADLINE - FRIDAY (5/10) at NOON ... ...
Photojournalism . . . Fashion . . . Portrait
Landscape . . . Abstract . . . Fine Art . . . Still Life
|
|
Week
#17: 5/14
|
Lecture:
• Final Sharpening Technique (12 Step Method)
...............Lab USM Method
...............High Pass Filter Method
...............RGB Channel Method
RED Channel / Edges Selection Method
• This technique selects the edges with the most contrast without
selecting the homogenous areas of tone (less chance of creating non-descript
artifacts). Only the more “contrasty” edges are sharpened
and will be the most subtle USM method. Good for people and images with
fine detail.
1. Select the Red Channel
2. Duplicate the Red Channel.
3. Filters – Stylize – Find Edges
4. Image – Adjust – Invert
5. Filters – Noise – Median, radius @ 2
6. Filters – Other – Maximum, radius @ 4
7. Filters – Blur – Gaussian Blur @ 4 (airbrush any spots
out at this stage)
8. Click RGB layer and Cmd/Click the 'Red copy' (the new alpha channel
you've been working on). This selects the areas of highest contrast
as a selection.
9. Filter – Unsharp – set amount at 125%, radius at 0.3, and
threshold at 3 (in a digital capture try a setting of 75%, radius 1.5,
threshold 3).
10. Deselect
11. Alpha channel to trash
12. Repeat for increased sharpness if necessary.
Additional Suggestion:
• If sharpening effect is too intense, start over and adjust the
unsharpen threshold to a value of 1.
• Make an Action function key out of these steps and you can repeat
this effect progressively at will by hitting the pre-assigned function
key.
• Colorizing
Techniques
Critique:
• Sleep
Sonnets (finals)
Lab:
• 10 - Print Portfolio |
| |
|
|
Finals Week: 5/21
|
Lecture:
• Duplicate Mapping & Motion
Lab:
•
10 - Print Portfolio
|
|
GRADUATION
WEEK: 5/28
|
FINAL PORTFOLIO
REVIEW
HAVE A GREAT
SUMMER !
|
|
*
|
Schedule content and projects
may be changed by instructor |
| |
|