
Using CSS
Joseph Lowery
This video explains what cascading style sheets (CSS) are. You learn the basics of CSS and the primary interfaces in Dreamweaver to work with CSS. You learn how to apply basic CSS to a web page that contains text using Dreamweaver; specifically, you create and embed a new CSS rule for a heading and paragraph.
Requirements
To follow along with this article, you will need the following software and files:
- Dreamweaver CS3
- Sample file (ZIP, 6.7 MB)
Watch this tutorial in the Adobe Creative Suite 3 Video Workshop.
Using CSS
- In Dreamweaver, choose File > Open and choose the 01_understanding_css.html file. Click Open. This is a simple HTML page to which you'll apply styles using CSS rules.
-
A CSS rule has two main parts: the selector and the properties. There are three basic types of selectors: tags, such as
p(paragraph) andh(heading), classes, and IDs. Both classes and IDs are custom tags. Classes can be applied many times throughout your page; IDs are applied just once (see Figure 1).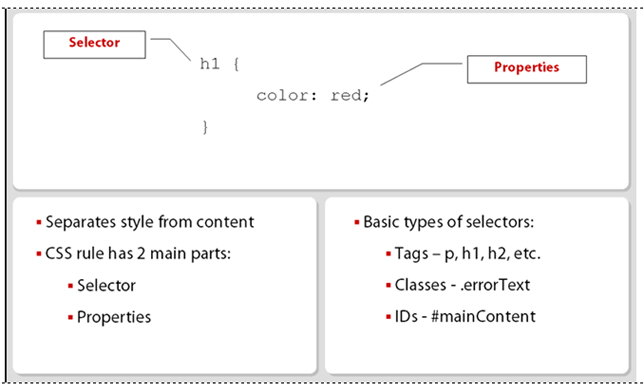
Figure 1: A CSS rule has two parts, a selector and properties.
-
Choose Window > CSS Styles to open the CSS panel group and choose the CSS Styles panel. Click the Add button to add a new rule. This opens the New CSS Rule dialog box (see Figure 2).
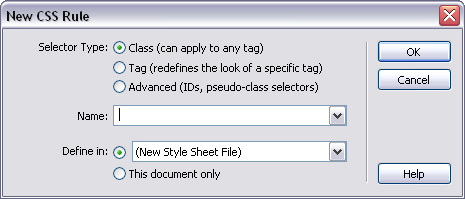
Figure 2: Use the New CSS Rule dialog box to create a new rule.
CSS rules can be contained in three places: in an external (.css) file, embedded in the page in an internal style sheet, or (this method is not recommended) placed in-line with tags.
-
In the New CSS Rule dialog box, choose these options:
- Select Tag as the Selector Type to embed the CSS rule.
- Type h1 in the Tag text box.
- Select This Document Only.
-
Click OK. This displays the CSS Rule Definition dialog box (see Figure 3).
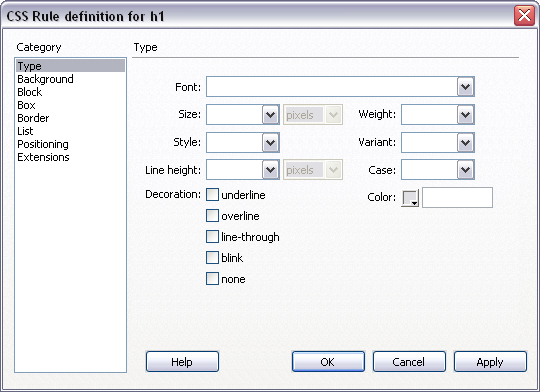
Figure 3: Use the CSS Rule Definition dialog box to define a rule.
-
In the CSS Rule Definition dialog box, choose the following options:
- Select the Type category on the left side of the dialog box. Choose Geneva, Arial, Helvetica, and sans-serif from the Font pop-up menu
- Click the Color fill box and select a red swatch.
- Select the Box category on the left side of the dialog box. In the Margins section, deselect Same for All. Enter 0 for the bottom margin.
-
Click Apply. Some of the changes take effect immediately (see Figure 4). But some rules, such as the bottom margin rule, won't take effect until you write a companion rule to work with it.
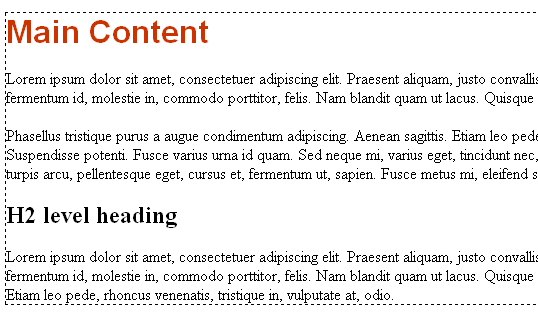
Figure 4: The heading is styled according to the CSS rule you added.
-
Click OK to close the CSS Rule Definition dialog box. The CSS Styles panel now contains the
h1rule with the defined properties below it.Now you'll attach an external style sheet.
- Click the Link icon in the CSS Styles panel. This opens the Attach an External Style Sheet dialog box.
- Click Browse and choose the css/demo.css file. Click OK to select the file and click OK to close the dialog box.
- Make sure the Property inspector is open. If not, choose Window > Properties to open it. In the Property inspector, click the New CSS Rule icon to open the New CSS Rule dialog box.
- Choose Class for Selector Type, and type .firstpara in the Name text box. Click OK.
-
In the CSS Rule Definition dialog box, choose the Box category. Uncheck the Same for All checkbox under Margins and then set the top margin value to 0. Click OK.
Nothing happens to the web page because the rule hasn't been applied to any elements yet. You'll do that now.
-
Select the first paragraph on the page. In the Property inspector, choose firstPara from the Style pop-up menu. This applies the style, moving the first paragraph directly below the first heading (see Figure 5).
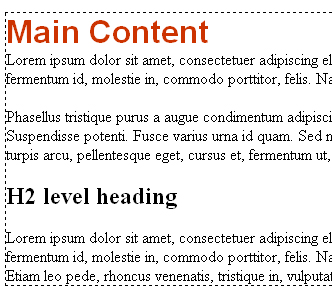
Figure 5: The firstPara rule reduces the space between the first heading and paragraph.
- To modify CSS properties, change them directly in the Properties tab of the CSS Styles panel. Select
.firstparain the CSS Styles panel and double-click 0 next to margin-top. Type 10, and press Enter or Return to change it back to 10 pixels. - For major updates, at the bottom of the Properties tab, click the Edit Style button to open the CSS Rule Definition dialog box. Use the options to change any of the style attributes.
-
To modify shorthand and double-clicking preferences in CSS handling, choose Edit > Preferences (Windows) or Dreamweaver > Preferences (Mac OS) and choose CSS Styles from the Category list on the left. Change the preferences as desired (see Figure 6).
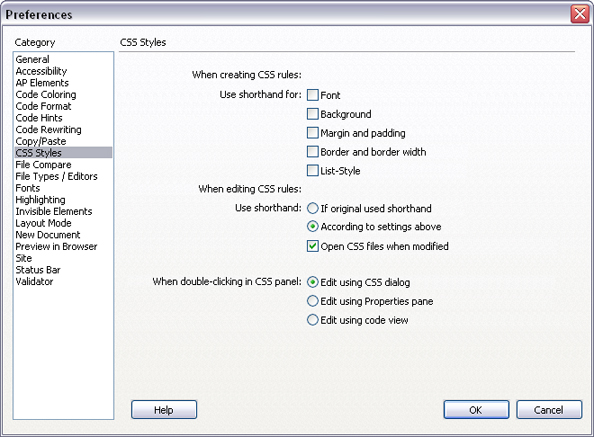
Figure 6: Use the Dreamweaver Preferences dialog box to change CSS shorthand and double-clicking preferences.
Where to go from here
For more information and additional tutorials, visit the Adobe Design Center.