Defining a remote server
Garrick Chow
This video shows you how to publish to a remote server, and includes an overview of the Site Definition dialog box.
Requirements
To follow along with this article, you will need the following software:
- Dreamweaver CS3
Watch this tutorial in the Adobe Creative Suite 3 Video Workshop.
Defining a Remote Site
When you publish a site, you're performing the act of copying the entire site to a server - a type of computer that's connected to the internet 24 hours a day, 7 days a week. When someone visits your website, they're viewing the version on the server. The version on your computer stays there, locally, and usually isn't accessed by anyone other than you.
Publishing your site often involves contacting a web hosting provider that will host your site, usually for a fee. The web hosting company should provide you all the information you need to connect to their servers and upload your site. This is the information you enter into the Site Definition menu in Dreamweaver.
Note the information in this tutorial is just an example. The information provided by your host will likely be completely different.
-
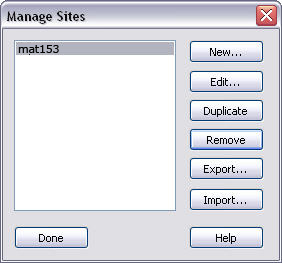
In Dreamweaver, choose Site > Manage Sites. This opens the Manage Sites dialog box (see Figure 1).

Figure 1: The Manage Site dialog box.
- If you have defined a site, skip to Step 3. If you have not yet defined a site, perform the following steps.
- Click New and select Site from the pop-up menu. This opens the Site Definition dialog box.
-
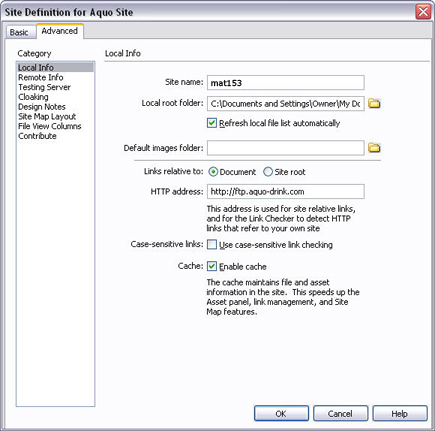
Select the Advanced tab and the Local Info category (see Figure 2).

Figure 2: Use the Site Definition dialog box to define a new site.
- The Site Name is a name of your choice that's like a nickname for your site. It's an internal reference and won't appear anywhere within the site itself. Type a descriptive name for your site (e.g. mat153).
- The most important information on this menu is the Local Root Folder. Setting the Local Root Folder is the act that defines your site. Start by clicking the folder icon next to the Local Root Folder field.
- Create a local root folder titled mat153 (if you are working in our labs, place this folder in the work folder).
- Mac users should navigate to and select their local root folder and click Choose. Windows users have to open the root folder (do not open any of the subfolders), and then click the Select button.
- Click OK.
-
Choose Remote Info from the Category list. The only field that appears initially is Access.
This field contains options for the way you'll access your remote server, including FTP, Local/Network, WebDAV and RDS. FTP, which stands for File Transfer Protocol, is the most common method for publishing sites to the web. Your web hosting provider will let you know if you need to use a different protocol, but chances are you'll be asked to use FTP.
-
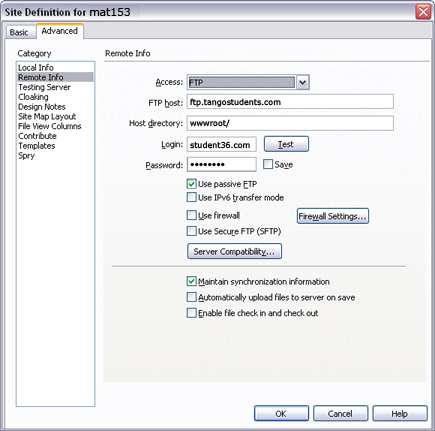
Choose FTP. This opens a new set of options (see Figure 3), starting with FTP host.

Figure 3: The Site Definition panel Remote Info tab.
- Your
web hosting provider may provide you with an IP address or just a URL
to use for the FTP host server address. It depends how their servers
are configured. Type in your FTP address in the FTP host field:
ftp.tangostudents.com
- The Host Directory field is optional.
In some cases, your web hosting company will provide the address of a
specific directory, or folder on a server where you'll place the files. Type in your host directory in the Host directory field:
wwwroot/
- Login and passwords are required for almost every web server. Type your login and password.
- If your computer is fairly secure, select the Save option to save the password. That way, every time you publish your files to the server, you won't be asked to re-enter it.
- At this point, you would normally click Test to run a test connection to the site and make sure your web hosting company provided you with the correct information.
- At this point, you've filled in all the information necessary to start publishing your site. There are other FTP settings in this menu, but most likely, you won't have to change the defaults unless you're specifically asked to by your web hosting company.
- Check Use Passive FTP check box
- Click OK to save the information.
-
A dialog box appears letting you know the settings have been changed. Click OK.
After Dreamweaver confirms the settings, you'll be returned to the Site Definition dialog box.
-
Click Done.
Now you're ready to connect to your remote server and start publishing your site.
Where to go from here
For more information and additional tutorials, visit the Adobe Design Center.