Since I am expecting your Final project to contain several files, heavy-duty content (digital Video files and sound files), and also so you can see your own work Online,
You are going to copy your Final project into our server as part of the Final assignment.
Your final project should be working on the server by Tuesday of the Finals' week for the face to face class, Thursday night for the online class.
We are not working on the SOMA server for personal accounts so please refer to the page on How to copy your work into the XYthos server.
Each one of you is supposed to have a folder inside our server (famous "soma.sbcc.edu")
I am going to show you how to MOUNT that small section of the server in your local computer, and then how to move your work to it so it can be seen On-line.
Since you are still working on your Final, we are going to practice with one assignment of your choice: past assignment, experiment that you have made on the side, or new assignment that you put together for the occasion.
This piece is going to be graded together with the assignment, so think about it and choose your "bet".
Remember that what you need of your project is the "swf" file, not the "fla" authoring document. Since your swf file is going to be seen on a web browser, you need to have an html document that frames the file.
The easiest way to do this (if you don't know Dreamweaver) is to open your "fla" file and choose FILE > PUBLISH
Flash will export the "swf" file, plus a simple html document with the background-color set to the background color of your movie.
| TO BEGIN WORKING | Type in a Window browser the address of our server (or click on the link below). The server's URL is : http://soma.sbcc.edu |
||||
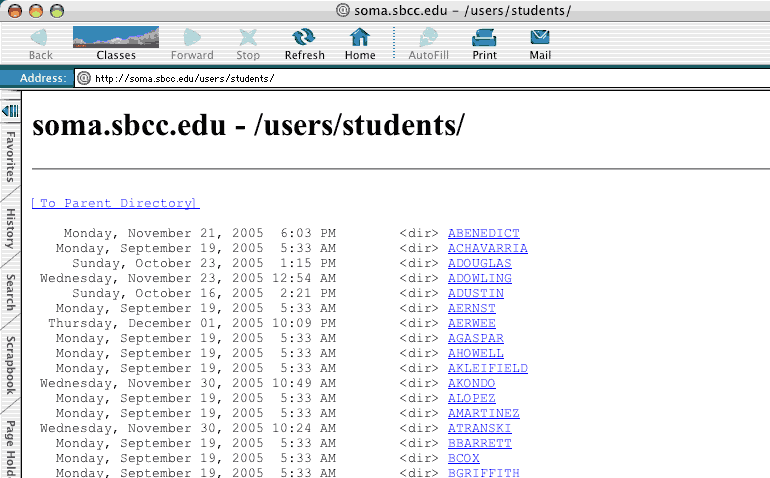
| STEP 1. | When you enter this URL path you are going to see a list of students with a folder (server-space) for the current Semester . Find yourself on that list. Your folder should have your name's Initial, followed by your family name. Write down the name of your folder in this page, since this is what you have to type later as a userID |
||||
 |
|
||||
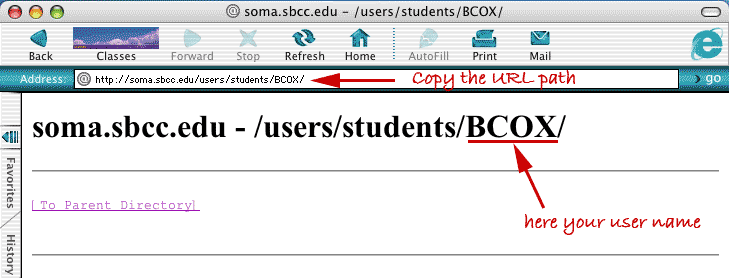
| STEP 2. | Click on your folder (the underlined name), Copy the URL path as the image below indicates: |
||||
 |
|||||
| STEP 3. From a MAC |
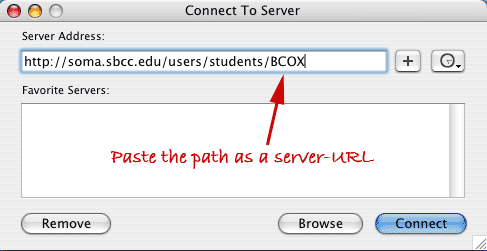
Now you need to connect to the server. Go > Connect to Server A dialogue box appears: On the "server address input box" paste the Address path that you have just copied. Wait a minute before you press OK: you need to change something in this path by hand. Read step 4 now. |
||||
 |
|||||
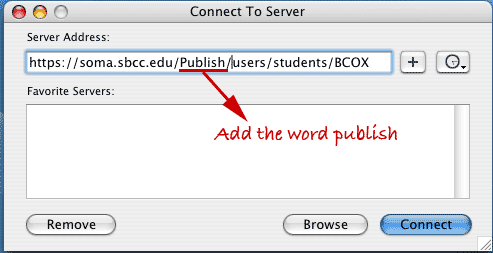
| STEP 4. | Since we want to be able to modify the content of that folder, we are going to alter the path-name, |
||||
 |
|
||||
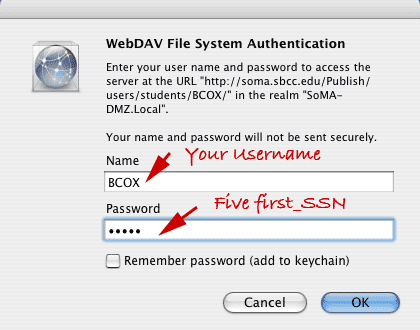
| STEP 5. | You are giving your username and password, like you would do when attempting to log into any Server. |
||||
 |
|||||
| STEP 6. | Once you go though the Authentication process, your folder gets mounted in your local computer, like any other External Volume (external hard drives, USB drives and others). Get your Html document, and swf file or files, and copy them into that volume (drag and drop system). Make sure that all the files are at the same level (no folders with things inside), just every file, one after the other. |
||||
 |
|||||
| STEP 3. From a PC |
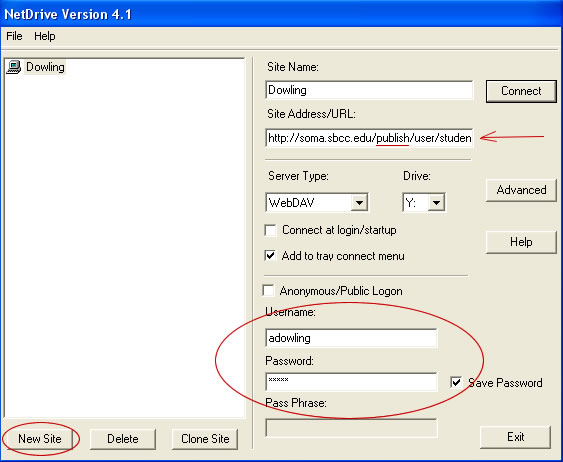
If you are working in a PC, we have figured out after the tests, that the best way to connect to our NOVEL server is to use a little application called Net drive. Here is a link to the application itself. Doubleclick and install it in your computer. You will use the Netdrive interface to connect to the server (similar operation than before)
Type your password (first five numebrs of your SSN) |
||||
 |
|||||
|
|||||
| TESTING | To test that the files has been copied over and are actually working on the server, come back to a Browser window and type the initial URL path: http://soma.sbcc.edu/users/students/YOURNAME Click on the html document (sometimes you will see every file "copied twice", look at the file size and click on the biggest one). If you have several projects in this folder, you will see several html documents. If you know html, you can always make a home-page (call it index.htm) and make links in that page to your projects. |
||||