Making a simple slide-show
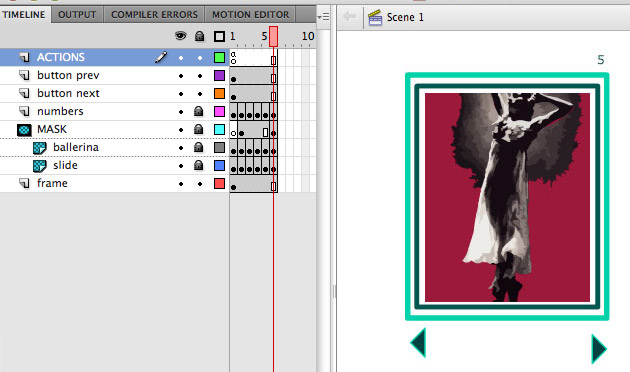
To build a Classic Slide-show , you need to have your content in a layer:
Bitmap-images, Flash Illustrations, or movieclip symbols organized in consecutive frames (one after the other).
In this case I have 2 layers for content, one with colored rectangles (slide), another with non-square artwork (ballerina).
It is a good practize to make a mask over all the content, this way all the slides will be exactly the same size (MASK).
Make sure you use an upper ACTION layer, where you will place the frame actions and the programming for the button.
I have made a layer for the numbers. This helps the user when you organice your content in this linear fashion.
Dedicate one layer for the back button, and a different one for the next button.
The methods to use for a classic slideshow are:
nextFrame();
prevFrame();
This really means "go to the next frame and Stop", or "go to the previous frame and Stop".
You don't need to enter ANYTHING as a function parameter (no number in the parenthesis, Flash already knows where to go!).
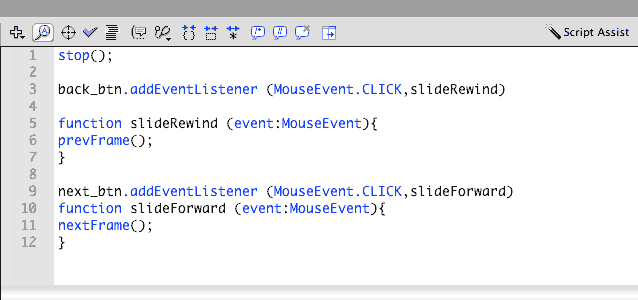
All the code can get attached, in this simple case to the first keyframe in the ACTIONS layer.
Remember to name the next and back buttons' instances in the Properties panel.
About using using Sound in Flash
To use a sound in Flash you first need to import it into your project.
You use the same IMPORT menu item that you use to import a bitmap-image.
It is better to import the sound to the Library.
After you press IMPORT, you will have to wait a little bit, meanwhile Flash processes the information, then you will see the sound-icon in the Library.
You can import aiff or wav files (those are uncompressed audio file-formats), but then you will have to deal with a big FLA file.
I recommend that, unless the file is really short, you compress your sound into an mp3 BEFORE you import the sound to Flash, using Audacity (3).
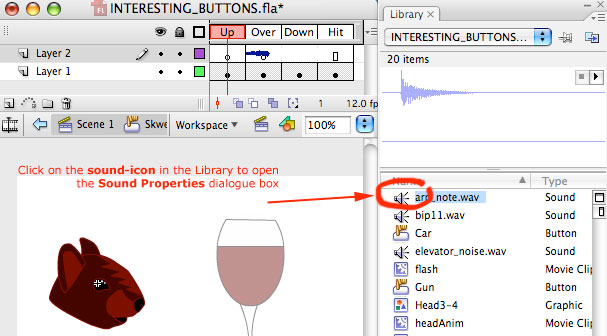
Set mp3 compression settings for the swf file inside Flash
Flash can compress into mp3-format when you export the file into swf, but your fla project will still contain the big un-compressed file that you imported to the Library.
Sometimes you will produce a very high quality mp3 that you set to higher recompression when exported to swf.
Make sure you test the sound with the new compression settings,in the "Sound properties window", to make sure that you are not creating any distortion.
You can also set audio recompression for wav or aiff files that you might be using in your project here.
Remember that a stereo file is basically a double file, with a left channel and a right channel.
Unless you really need that high-quality, it is still common policy nowadays to compress audio files into mono, to make the file smaller (half size!).
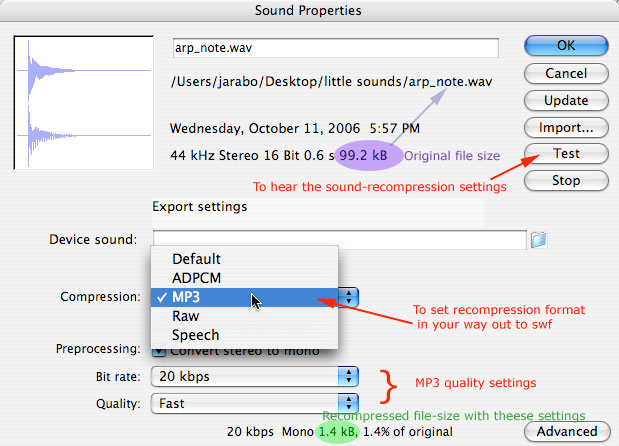
Add an imported sound to the Timeline
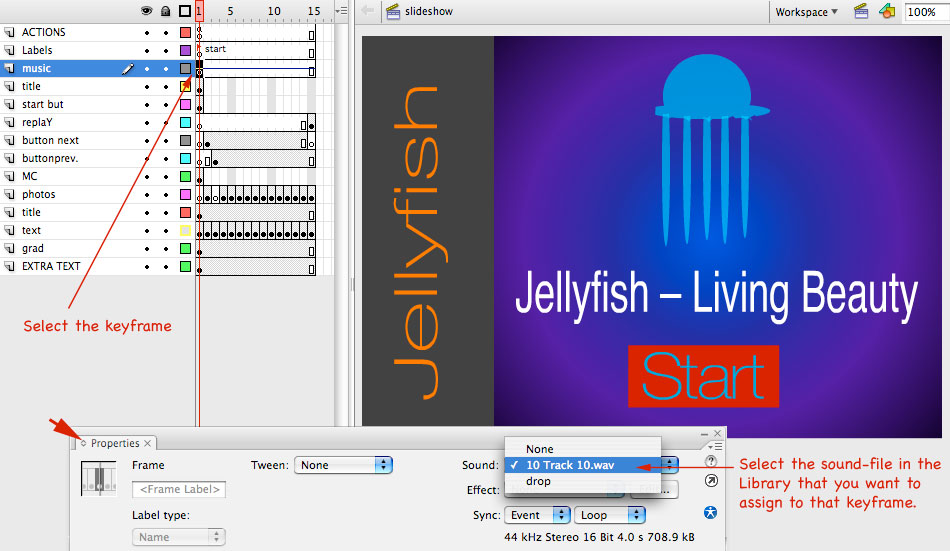
You can make a keyframe, and then drag the sound from the Library to the Stage Unce you drop it, you will see the sound-wave on the Timeline, beginning after the keyframe along the frames.
You can also select the keyframe in the Timeline, then go to the Properties Panel, and assign a sound to the keyframe. Look at the screen-capture on the right. SEE that the Sync mode is right below the spot, in the properties Panel. Sounds in the Timeline are usually set to Stream, but since we have a Stop in the Timeline and it is never going to play linearly, we will set it to Start. Sounds set to Start, don't beging playing again until the file is finished playing. Later on will will also learn how to place a background sound inside a movieclip-symbol. |
 |
Compressing sound in Audacity
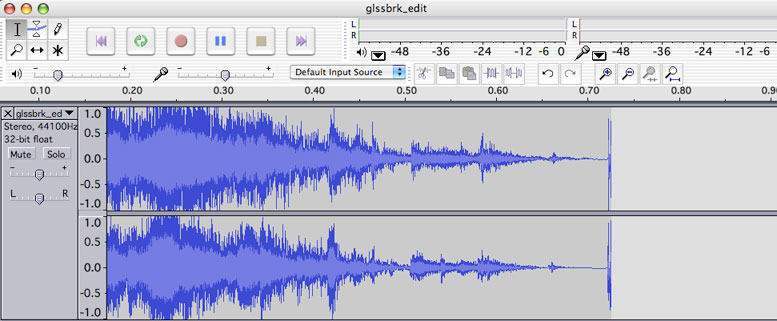
You can use the free software called Audacity to compress a file into mp3.
You will have to open the audio file in Audacity, and export it as mp3 format.
It will ask you for a sister application called "Lame Library".
Make sure you download the Lame Lib with the program and you know were is it located in your computer.
It will not ask you for mp3 settings when you export to mp3.
To change the mp3 settings, the quality and with it the file-size, you need to first change it in the preferences of the Audacity program.

Bit rate:
Dynamic range describes the ratio of the softest sound to the loudest sound in a musical instrument or piece of electronic equipment. This ratio is measured in decibels (abbreviated as dB) units.
The dynamic range of the sound decreases with lower numbers:
your sound-file will then sound like comming from a cellphone but the file size will decrease considerably.
Songs with differnt instruments should be keps at a higher bit-rate.
Human speech can be compressed to lower bit-rates without distortion.
You might have to compress it 2 or 3 different ways and then listen to the diference.
Adjusting the bit-rate in sound can be compared to reducing the color-palette when you compress a gif graphic.
The least amount of colors, the smaller the file, but certain types of graphics accept that reduction better than others.
A logo, originally with very few colors can handle the compression well. In the same way, a sound with a natural narrow dynamic reange (not too much variation) will accept this type of compression without much aparent loss of quality.
OPTIMIZING FILE FOR STREAMING: Improving rendering performance with bitmap caching
Runtime bitmap caching lets you optimize playback performance by specifying that a static movie clip (for example, a background image) or button symbol be cached as a bitmap at runtime. By default, Flash Player redraws each vector item on the Stage in every frame. Caching a movie clip or button symbol as a bitmap prevents Flash Player from having to continually redraw the item, because the image is a bitmap and its position on the Stage does not change. This provides a significant improvement in playback performance.
For example, when you create an animation with a complex background, create a movie clip containing all the items included in the background. Then select Cache as Bitmap for the background movie clip in the Property inspector. During playback, the background is rendered as a bitmap stored at the current screen depth. Flash Player draws the bitmap on the Stage quickly and only once, letting the animation play faster and more smoothly.
Without bitmap caching, the animation might play back too slowly.
Bitmap caching lets you use a movie clip and freeze it in place automatically. If a region changes, vector data updates the bitmap cache. This process minimizes the number of redraws that Flash Player must perform, and provides smoother, faster playback performance.
Only use runtime bitmap caching on static, complex movie clips in which the position, but not the content, of the movie clip changes on each frame in an animation. The playback or runtime performance improvement from using runtime bitmap caching is only noticeable on complex-content movie clips. Runtime bitmap caching with simple movie clips does not enhance performance.