1.
![]()
You begin by placing a "IN" keyframe and a "OUT" keyframe, in the same layer on Stage, to mark the 2 poses you want to animate from and animate to.
(those are just 2 keyframes along the timeline, but we call them IN and OUT to make things clear and underline that you first need to set the begining and then the end of it)

The content of those 2 layers need to be Raw shapes and raw lines, no content should be grouped. No symbols.
If some of the content is grouped you should break it first (Apple_B, or command_B on a PC).
Once you have set an IN and an OUT keyframe, select the IN Keyframe, right click and select "Shape tween".
That will create a green band with an arrow between both, IN and OUT keyframes, up in the Timeline area.
If the arrow, instead of looking like a clean line, looks like a dotted line, you need to check out the elements in both, IN and OUT keyframes. You probably have some groupped element in one of them that can not get calculated and the program is complaining about it.
You can SHAPE tween several shapes and lines in one operation (by having all that content in one layer) but this simplest strategy is
NOT going to give you good control over the morph effect.
If you want to better control the visual effect of the tween, you need to divide the content on several layers.
so you end with several simple shape tweens happening at the same time, that produce 1 visual effect on Stage.
This is what we call a "complex shape tween".
Below you can see an example of a complex shape tween that uses 5 layers of shapetweens plus frame by frame work to create a great effect: from kitchen to space.
Notice how well structured the layers are.
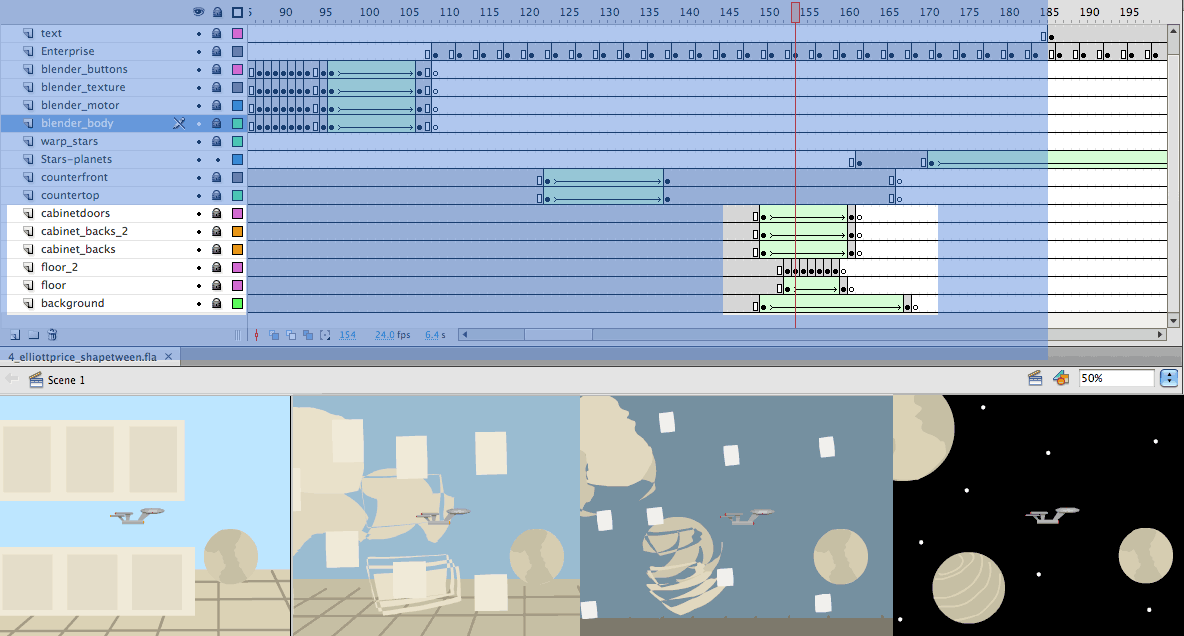
Notice how structured is the Timing in this piece: There is Action, then a little pause, then Action again.
You need to use pauses (of half a second or more), right before something important happens. A pause is also necessary at the end of a story (a second or more there). |
If you are using text as an element of your Shape tween you need to break down the text to get the morph effect to work.
If you break down a word (select and click Apple_B), it will get divided into a series of individually grouped letters.
To get all the text to become a raw shape, you need to break it down again.
After you break it down twice, you will see the letters selected with the tyipical "moire pattern" of raw selected objects.
Once the text is broken you could apply a line around your raw-shaped text to create a different effect to your text.
Consult the related pages in my website (they illustrate the same examples used in your assignment-sample files).
