Things that you should know about using color by the end of thi week:

color panel

Applying gradients. Locate the Color Panel in Flash?

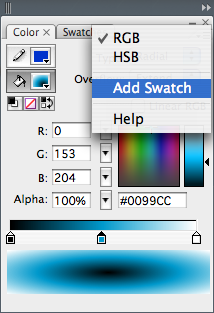
When you make a gradient in the color panel, you should think about saving it as a new Swatch in the color panel,
so it shows up in the future in your project's color palette (the palette that you see when you look at the fill colors or stroke colors in the tool bar).

You can add any color to the color palette's by selecting or making the color, clicking on the little icon at the upper right of the color Panel,
(looks like 3 horizontal lines), then choosing Add Swatch from the menu.

Next time you select strokes or fill colors in the Tools palette, the new color will be available, down after the web-safe palette.

I made a flash movie explaining gradient overflow. You can only see it from a computer (it is an sfw, so it needs the flash player). When you see the extension warning, choose "Show flash for now"
http://soma.sbcc.edu/users/Ajarabo/F_online/gradient_overflow.htm
 
gradient transform

When you apply a color to a shape with the paint-bucket tool, you are applying the gradient to the shape in a certain way and direction.

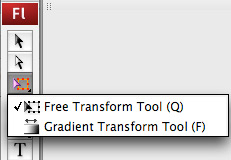
To modify the way that shape is filled with the gradient (rotate the gradient, scale the gradient or moving the position), you have to use
the Gradient-transform tool, located inside of the scale/ free-transform tool.

You will see a diagram of a circle around your gradient (might be outside the shape you are trying to fill).
Both, Linear and Radial gradients can be redefined this way: you can move the center of that circle over the shape, you can scale it proportionally, or creating an ellypse (for radial gradients).
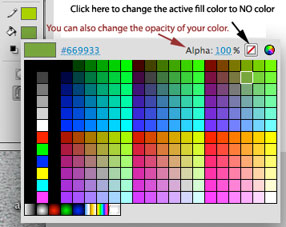


At the bottom of the tools, on the Tool Bar you can see the PENCIL and BUCKET icons.
They show the active color for each Type of element.
You will click on the color rectangle to choose and active color for the LINE (pencil icon) or the FILL (bucket icon).

You can even set each one of them to No Color, to draw a PRIMITIVE SHAPE with no line or no fill.


Working with Frame by frame Animation.

In this module, we will be working on Frame-by-Frame Animations using a sequence of keyframes.
Please notice that you canot use Motion tweens or Shape tweens in this assignment.

Take a look at my help page about Keyframes and frames in the timeline.
http://soma.sbcc.edu/users/Ajarabo/F_online/keyframes1.htm

http://soma.sbcc.edu/users/Ajarabo/F_online/keyframes2.htm

My training Movies for this week.

1_Beginner on Frame by frame animation, shorcuts and organization.

2_Working with layers in animation (big movie)

3_Copy/pasting chuncks of Animation on the timeline.


Keyboard sortcuts when you work with frames and keyframes.


F5

Press that key on your keyboard as a short-cut to add a frame, after you select the frame in the timeline.

You can select several layers at the same time.

F6
Press that key on your keyboard as a short-cut to add a Keyframe, after you select the frame or frames in the timeline.
The new keyframe contains by default the same information that you had in the previous keyframe.
F7
Press that key on your keyboard as a short-cut to add a blank Keyframe, that is an empty keyframe with no content.

Keyboard sortcuts to erase frames and keyframes.


Shift + F5

Press that keyboard-combination as a short-cut to delete a frame or a series of frames, after you select the frame/frames in the timeline.

You can select several layers at the same time.

Shift + F6

Press that keyboard-combination as a short-cut to delete a Keyframe, after you select the keyframe or keyframes in the timeline.
The content of that keyframe will disappear and you will see the content of the previous keyframe spreading though.

Blank keyframes also get deleted this way (there is not Shift + F7)

Keyboard sortcuts


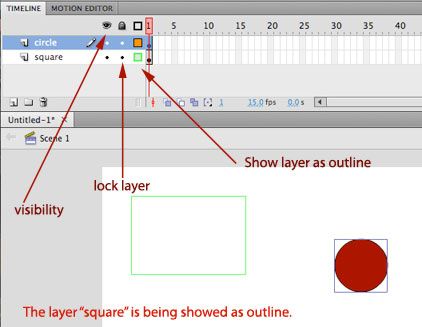
See the artwork of a layer as outlines.

Changing the visibility of the layer into an outline will help you finding the gap if your line was very thick.
Each layer has a different outline color when you click on the little colored rectangle.
The icon is at the end of the Layer row, right before the line that separates the Timeline.

Check also the visibility and lock elements of the layer.


Contolling the Snappping.

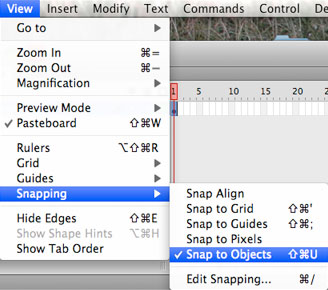
The snapping feature acts like a little magnet and it helps close gaps in shapes.

If you want to close simple shapes easily you should draw with SNAP TO OBJECTS ON.
On the contrary, if you are tracing a complicated image, toggle it off.

There are sveral types of snapping.


Options for the Paint-bucket tool.

The bucket tool is used to fill a CLOSED line with color.
You might think that your line-shape is closed when it actually contains a gap. Changing the visibility of the layer into an outline will help you finding the gap if your line was very thick.

You can also use the GAP SIZE option menu and change the gap to medium or large gap.

Watch my training_movie on how to copy/paste or paste in place artwork.
It also shows how to Copy and Paste frames of an Animation : being a sequence of frames, in one or through several layers.

You will also see how to use the Edit Multiple frames tool to alter a sequence of frames (position, rotation, scale...) and How to turn layers into outlines so you can better see the content placed on each layer.

http://soma.sbcc.edu/users/ajarabo/F_online/A_MOODLE_FILES/Training_movies/copy_paste_frames.mov