Project: Self-mailer, Full color Brochure
Grade: 100 points (see rubric)
Due: Monday, Week#14 (upload link will be located there)
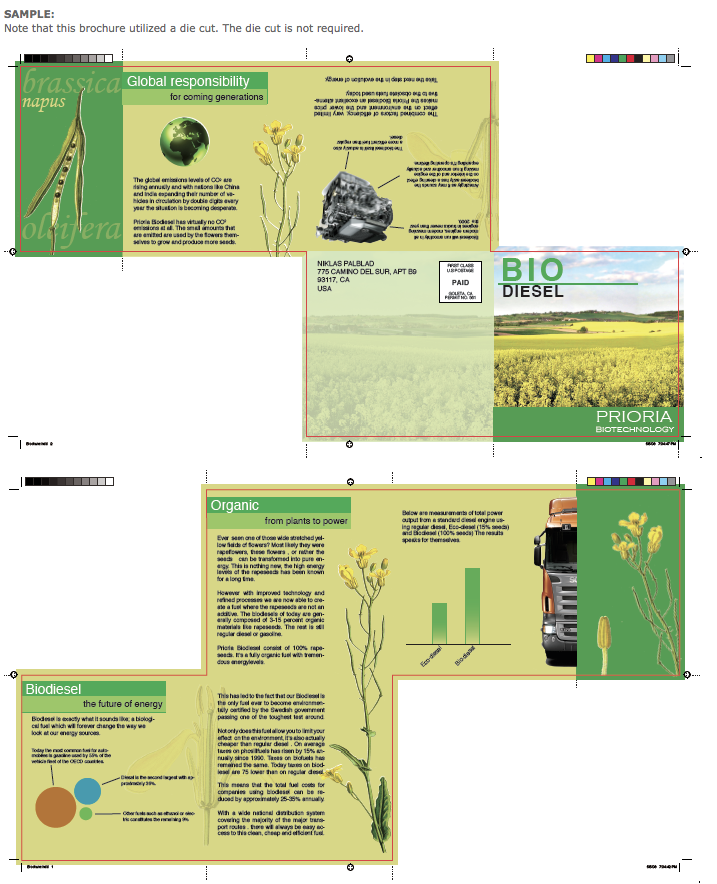
Project Sample#1 -PDF
Project Die-Cut Sample -PDF
Objective:
Design and layout a full color, self mailer brochure for the company product you have been working on in the Ad Series Project. You may use a die cut but it is not required. If you do use one you must include a die-line (how to set this up will is explained below). Make sure to read the specifications in #6 BEFORE starting your design process so you know what must be included.
As you begin to think about how your brochure will fold and where you will incude a die-cut, you must also think about the USPS(US Post Office) regulations. What are your size limitations? When you are using a die-cut, itshould be designed to fold inside so the die-cut panel will stay closed. If it is an outside end panel, it will be an extra cost to your client to have a sticky of some kind to keep it closed. These are important things to think about before designing.
As we all know, a Graphic Designer is no longer just designing for print. Many companies want to include an interactive brocure as a PDF for a client to download or for their website. Designing an interactive brochure will be your final assignment and will be introduced in Week#13.
As you begin to think about your print brochure design, think about how you could create an interactive brochure from the same design. After your print brochure is completed you will take that design and create several interactive parts. You will learn how to do this in the next couple of weeks. But be thinking about what you might have as a slide show, or include a video or audio.
1. Research - The Design Brief has been created. Refer to it to review objective.
• Before you begin designing, visit the company website. You will need to decide what STYLE and TYPE of brochure this will be and explain why you have chosen this style and type in the forum. This will help you decide on a tone (serious, playful etc.) for the brochure.
Your client will give you information for the brochure but for our purposes I suggest you copy the information from the web. (Note that ordinarily you NEVER copy text from the web but because this is only for an assignment it is ok). You may also gather the content by OCR scanning the information from printed material.
Your brochure must have at least THREE paragraphs of information as well as images/photos.
•Type experiments - Review type examples from Pt.1 of project.
2. Thumbnail Sketches - Why do them?
Thumbnail Examples - (PDF download)
BEFORE you begin your thumbnails, look at all the sample brochures on the links provided below this project link.
Choose three to use as a starting point for your thumbnails. It's best for beginning designers to "copy" well designed layouts. The design becomes your own once you add your photos, graphics, colors and text.
(photograph or scan or create on computer)
Create 3 NEATLY sketched layouts/thumbnails created on plain drawing paper (lined paper will not be accepted.
•Try and think beyond the ordinary 3 or 4 panel layout.
See the many examples in weeks #9 and 10.
•Begin your thumbnails with a GRID.
The grid will lessen your design time and improve your layout.
•Experiment with different types of brochure layouts (see examples provided in Wk#10) and do not design the traditional tri-fold brochure. Choose a design that works with your concept and copy the layout!
Fold FactoryThis site has examples of very creative folds choose one of these creative folds for your brochure.
Fold of the week Youtube archive.
•Prototype (PDF download) - a small physical replica of thumbnails. This will help you visualize how your folds will work. This is where you will make fold changes.
After you have completed your Thumbnails, cut small but proportional samples of at least TWO different thumbnails using TWO different folds. These will NOT be handed in. They are for your benefit and will help you develop an interesting brochure.
Draw your layout onto these small pieces of paper.
Experiment using different folds and roughly sketch your ideas on these physical prototypes.
These layouts are for experimenting with placement of elements and concept development. Do not worry about the amount of copy at this point. You will then choose the best layout and work in InDesign full size.
3. Create one full size mockup PDF Download- (photograph so folds can be seen)
Using 11" x 17" paper (or tape two sheets of paper together), trim this to the size of your brochure. Then, manually sketch and color your chosen thumbnail layout of the final full brochure size. The layout should be tighter than your thumbnails and clearly evident as to layout, folds, the grid, the images and headline font style. This is where you will determine the sizes of your panels.
•DO NOT use boxes that are empty or blank for the images. Actually draw what they will look like. The drawings can be loose, stick like but clear.
•DO NOT work on the computer at this point.
•DO NOT cut out pictures and paste them in your layout. This is to be done entirely by hand.
Once you have drawn the layout, trim and fold it with the 2 sides stapled or glued back to back. You will use this mock-up to determine where the fold lines will be placed in your Indesign document.
4. Prepare Images
Images will be full color and must be a high resolution (300DPI) if they are raster based (Photoshop). Try and use your own photos or illustrations. DO NOT download any files from the web unless they are high resolution and you have permission to use them (such as from a stock photo site - see Week#3).
All placed/linked files must be either Psds, Tif(f) or EPS format for print and CMYK - never RGB. The design may include the use of rules, borders and background tints, bleeds, photos and any logos. Again, be creative.
You are required to have a minimum of three paragraphs of information in your brochure.
5. Indesign
• Indesign Brochure Tutorial
• lynda.com Brochure Tutorial
Using your mock-up as a guide, begin your layout in Indesign with a GRID. Once you begin to layout your elements, you may alter the grid if necessary but be consistent on both sides. Set up your document with 2 pages in one document (front and back).
You will up load a computer rough for critique.
(save as different files as you make critique changes)
6. Specs:
• Page Size: Choose a page size that will work for your design but will print on 11x17 paper. A common size is 9" x 16" (54px96p) document in InDesign and will be printed on 11"x17" paper stock. OR You may choose a slightly different size if the design requires it but stay close to the 9" x 16". Be sure to check the Post Office regulations first to make sure piece can be mailed.
DO NOT create a tri-fold 8.5 x11" brochure. Be Creative!
•Bleed - One element must bleed.
Do color backgrounds and images bleed over the edge of the brochure?
You’ll have to create bleed areas for them on the pre-press.
Do type blocks overlap or bleed over the folds? Its OK if headlines stretch across (you can
allow for some extra letter space between the folds) but DO NOT have small type - 11 pt. &
below cross over a fold, Its hard to read and intrudes on the design.
•Set bleed lines in Document setup. Add .125" (9pts) bleed line if images or art butts up to edge of the design trimline. All images to bleed, MUST extend about 0.25" (18pts) BEYOND the set bleed line in order for it to print as a bleed (see example below).
•Image Art: At least THREE different photos to be included in your brochure.
Your design may include rules, borders, graphic shapes, background transparencies,
(TINTS are only for spot colors), drop shadows, false duos, bleeds, graphs, photos and
logos. Again, be creative.
Before placing pictures in InDesign you need to “optimize” your images in Photoshop
so that they will place and print correctly and with the highest quality. Here are some guidelines
for placing and optimizing art for your brochure:
Photographs - raster images in Photoshop
• To be full color - not duotone or spot colors
..... • Must be a high resolution 300 DPI - resample to avoid bit mapping
..... • Must be approximately the size you want in your mockup (do not place smaller or huge sizes)
..... • Adjust tone and contrast in Photoshop - window>Image>adjustment
..... • Sharpen image (if a picture) or sharpen edges (if a lot of type) in window>filter>sharpen
..... • Save as a tiff or PDF to place into InDesign.
• NOTE: Photos will be converted to CYMK in the pre-press stage.
..... • DO NOT download any files from the web unless they are high resolution and you have
permission to use them (such as from a stock photo site - see Week #6)
..... • Clipped photos can be brought in with white backgrounds to be clipped in InDesign or you can clip them with the clipping path in Photoshop (best).
Illustrations/graphs - vector images
..... •Save your illustrator images as EPS or ai to place in InDesign with transparent backgrounds.
QR Code - Using a QR code generator, addthe symbol as part of your design. The info may be a web address or message to the consumer.
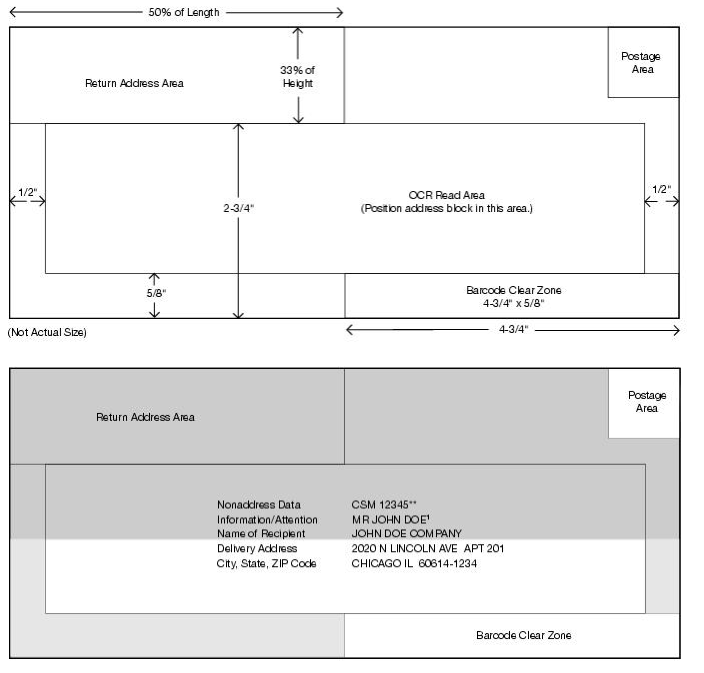
•Self-mailer: Return address & indicia (with info inside it) must be included on one panel. Check the US Post Office site for mailing specifics and how to set up the indicia.
•Place the indicia in the upper right hand corner about .25" from fold line and from edge of paper.
•The indicia is a one inch box (with a frame) and contains the following (or the permit # of the company) and is usually no larger than 10 point type:
PRSRT STD
US Postage
PAID
Santa Barbara, CA
Permit No. 1234
•Return Address goes on the mailing panel usually in the upper left hand corner about .5" (3p) from fold line and from edge of paper.
•Keep point size appropriate for information and font used.
Usually 9, 10 or 11 point will work.
•Make sure to be creative with this panel. It is the first thing the recipient sees. Any art in the area of the indicia or mailing address (not return address) MUST be no more than 10% of any color unless the color is a pastel.
•Fold marks:
Manually add fold lines (dotted lines, set to registration color so they print on each color plate Window>stroke>Type-dash>4 pt. dash/4 pt. gap) that begin .125" (9pts)from the document trimline and extend .375" (27pts long) to the outside of the document. The fold lines will be different on each page because of the folds. Experiment with folds. . Set to registration color
so they print on each color plate that begin 125” (9pts) from the document
trim line and extend .5” to the outside of the document.
The folds will be different on each side, create the fold mark in the slug of each page (see video-Folding a tri-fold brochure). Although you are allowed to create a tri-fold brochure, this information about different size panels is the same for any folded brochure.
Crop Marks: Also select "crops" and "bleed" in the print dialog box. That way your crop marks and bleed will show when you need to trim your piece.
Make sure All images to bleed, MUST extend.25" (18pts) BEYOND the set bleed line in order for it to print as a bleed. This also allows the fold lines to print.
•Panel sizes - In a 3 panel brochure the cover and back panel will be 1p larger than others. If more than 3 panels, reduce additional panels 1p each time it folds in.
Do not limit your design to a regular paneled brochure.
• Printing Brochure - Print your brochure in color on white, coated plain paper.
DO NOT prin the brochure on a heavy or card stock. When folded, it will be heavier
than the standard postage rate requires.
Brochure MUST be printed on one sheet of paper front and back.
Some brochures need one sticky closure.
More than one sticky to keep brochure closed is not acceptable.
•Final brochure - (photograph so folds can be seen)
Export from Indesign as a PDF high quality.
Include this pdf in final multipage pdf.
Print and carefully trim and fold final design and then photograph
from 2 or 3 different angles to show folds and images.
Mail Printed, Trimmed and folded brochure to me so
I receive it by Monday,Week#15.
Address the selfmailer to me and add a stamp.
DO NOT place in an envelope. If it costs you extra money to
mail, that indicates that you have not reviewed the
USPS mailing requirements and you will lose points.
Also think about how your piece will fold.
If your design includes a die-cut, have the die-cut designed so it folds
inside the brochure. This will eliminate the damage that might happen if the die-cut
is one of the outside panels.
Print in color, 2 sided. A brochure that is taped together (front and back),
will not mail properly. If you can come to the DAC, it can be printed on
card stock on both sides. You may also have it printed at Kinkos or any
quick print shop. Be sure to ask for car stock.
Liz Russotti
SBCC
721 Cliff Drive, Santa Barbara, CA 93109
• Upload ONE PDF to Moodle
Include in a single multiple page pdf file:
- Thumbnails, black and white
- Photographed Mockup (1)
- Different versions of Rough (minimum 2)
- Include all computer versions after critiques
- Final full color brochure pdf files with all printers marks and bleeds
including document bleed settings selected when exporting to PDF.
- Photographed final printed and trimmed version of your borchure.
Be sure photography is well-lit and cleanly presented.
Make sure to use your grading rubric as a checklist.
Missed details can cost you points.
THIS FINAL ASSIGNMENT WILL NOT BE ACCEPTED LATE and may not be redone.
All parts MUST be included.
To create a diecut, you need to create a Dieline-colored plate, which will be output separately
so the craftsman printer can build the embossing or cutting die accurately.
Create a spot color plate, named "Dieline" so its meaning is obvious.
You may want to choose some strange color for it (RGB bright green, for example) which does not appear in your layout,
so you can see exactly where it goes.
Finally, you need to adjust the trapping settings for the Dieline ink so it overprints everything;
you do not want the dieline to be knocked out of the artwork!
Then you simply draw an outline showing the shape to be embossed, debossed or diecut.
As a last, final check for any tricky print job, print out separated laser prints of the job.
You can lay them over each other on a light table and confirm the job behaves as you expect it to, and that nothing is missing.